How to Perform CRUD Operation with a custom module in Magento 2

CRUD Operation in Magento 2
CRUD Operation in Magento 2 can manage data easily in the database. In the previous tutorial, you learned how to create models, resource models, and collections in Magento 2. Now, we will learn how to perform CRUD operations with a custom module in Magento 2. To create a CRUD operation, you do not have to enter several line codes. Magento 2 offers functions for easy handling in the database. You can also hire Magento developer from Dolphin Web Solution.
We will see below content for CRUD Operation with a custom module.
- Create Database
- Create Module
- Read and Display Data from the Table
- Insert Data
- Update Data
- Delete Data
Step 1: Create Database
We discussed how to create, drop or other operations using Declarative Schema. So you can see the tutorial and create Declarative Schema. Declarative Schema facilitates the installation and upgrading of code that is contained within a single XML file. We can perform the following operations with DDL(Data Definition Language) and DML(Data Manipulation Language).
Step 2: Create Module
We are already learned how to create a basic module in Magento 2. We need to create module.xml, registration.php, routes.xml, and Controller file. You can create module.xml, registration.php, and routes.xml from this tutorial. Now we create controller file Index.php in app/code/Dolphin/MyModule/Controller/Index with the following code.
<?php

namespace Dolphin\MyModule\Controller\Index;

use Magento\Framework\App\Action\Action;

class Index extends Action
{
    protected $_resultPageFactory;

    public function __construct(
        \Magento\Framework\App\Action\Context $context,
        \Magento\Framework\View\Result\PageFactory $resultPageFactory
    ) {
        $this->_resultPageFactory = $resultPageFactory;
        parent::__construct($context);
    }

    public function execute()
    {
        echo "Module Cretaed Successfully";
    }
}
Now, run the command for cache clean and run URL yourdomain/mymodule/index/index in your browser.
Step 3: Read and Display Data from the Table
Let’s check and follow this tutorial for how to create Models, Resource Models, and Collections to manage data in the table.
Now, add the below code in execute method in the controller file.
public function execute()
{
    return $this->_resultPageFactory->create();
}
Create layout file mymodule_index_index.xml in app/code/Dolphin/MyModule/view/frontend/layout folder with the following code.
<?xml version="1.0"?>
<page xmlns:xsi="http://www.w3.org/2001/XMLSchema-instance" xsi:noNamespaceSchemaLocation="urn:magento:framework:View/Layout/etc/page_configuration.xsd">
    <referenceContainer name="content">
        <block class="Dolphin\MyModule\Block\Index" name="mymodule_index_index" template="Dolphin_MyModule::index.phtml" />
    </referenceContainer>
</page>
Create block file Index.php in app/code/Dolphin/MyModule/Block folder with the following code.
<?php

namespace Dolphin\MyModule\Block;

use Magento\Framework\View\Element\Template;
use Dolphin\MyModule\Model\ContactFactory;

class Index extends Template
{
    protected $_contactFactory;

    public function __construct(
        Template\Context $context,
        ContactFactory $contactFactory
    ) {
        parent::__construct($context);
        $this->_contactFactory = $contactFactory;
    }

    public function getData()
    {
        $contact = $this->_contactFactory->create();
        $collection = $contact->getCollection();
        return $collection;
    }
}
Create template file index.phtml in app/code/Dolphin/MyModule/view/frontend/templates folder with the following code.
<table>
    <tr>
        <th><?= __('Name'); ?></th>
        <th><?= __('Email'); ?></th>
        <th><?= __('Contact No'); ?></th>
        <th><?= __('Message'); ?></th>
        <th><?= __('Created At'); ?></th>
        <th><?= __('Updated At'); ?></th>
        <th colspan="2"><?= __('Action'); ?></th>
    </tr>
    <?php
        $collectionData = $block->getData();
        foreach($collectionData as $collection):
    ?>
    <tr>
        <td><?= $collection->getName(); ?></td>
        <td><?= $collection->getEmail(); ?></td>
        <td><?= $collection->getPhoneNo(); ?></td>
        <td><?= $collection->getMessage(); ?></td>
        <td><?= $collection->getCreatedAt(); ?></td>
        <td><?= $collection->getUpdatedAt(); ?></td>
        <td>
            <a href="<?= $block->getUrl('mymodule/index/edit').'id/'.$collection->getId(); ?>" class="action primary">Edit</a>
        </td>
        <td>
            <a href="<?= $block->getUrl('mymodule/index/delete').'?id='.$collection->getId(); ?>" class="action primary">Delete</a>
        </td>
    </tr>
    <?php endforeach; ?>
</table>
Now. run the command for cache clean and run the URL yourdomain/mymodule/index/index in your browser.
Step 4: Insert Data
Create controller and action for insert action. We can add the following code to the index.phtml file in app/code/Dolphin/MyModule/view/frontend/templates folder.
<a class="action primary" href="<?= $block->getUrl('mymodule/index/insert'); ?>">Add Record</a>
Now, create controller file Insert.php in app/code/Dolphin/MyModule/Controller/Index folder with the following code.
<?php

namespace Dolphin\MyModule\Controller\Index;

class Insert extends \Magento\Framework\App\Action\Action
{
     protected $_pageFactory;

     public function __construct(
          \Magento\Framework\App\Action\Context $context,
          \Magento\Framework\View\Result\PageFactory $pageFactory
     ){
          $this->_pageFactory = $pageFactory;
          return parent::__construct($context);
     }

     public function execute()
     {
          return $this->_pageFactory->create();
     }
}
Create layout file mymodule_index_insert.xml in app/code/Dolphin/MyModule/view/frontend/layout folder with the following code.
<?xml version="1.0"?>
<page xmlns:xsi="http://www.w3.org/2001/XMLSchema-instance"
     xsi:noNamespaceSchemaLocation="urn:magento:framework:View/Layout/etc/page_configuration.xsd">
    <referenceContainer name="content">
        <block class="Dolphin\MyModule\Block\Insert" name="mymodule_index_insert" template="Dolphin_MyModule::insertData.phtml" />
    </referenceContainer>
</page>
Create block file Insert.php in app/code/Dolphin/MyModule/Block folder with the following code.
<?php

namespace Dolphin\MyModule\Block;

class Insert extends \Magento\Framework\View\Element\Template
{
     protected $_pageFactory;
     protected $_postLoader;

     public function __construct(
          \Magento\Framework\View\Element\Template\Context $context,
          \Magento\Framework\View\Result\PageFactory $pageFactory
     ){
          $this->_pageFactory = $pageFactory;
          return parent::__construct($context);
     }

     public function execute()
     {
          return $this->_pageFactory->create();
     }
}
Create template file insertData.phtml in app/code/Dolphin/MyModule/view/frontend/templates folder with the following code.
<div id="custom-form">
   <form class="contact custom"
         action="<?php echo $this->getUrl('mymodule/index/save', ['_secure' => true]);?>"
         id="custom-form"
         method="post"
         data-hasrequired="<?php  echo __('* Required Fields') ?>"
         data-mage-init='{"validation":{}}'>

        <fieldset class="fieldset">
            <legend class="legend"><span><?php  echo __("Contact") ?></span></legend><br />
            <div class="field name required">
                <label class="label" for="name"><span><?php  echo __('Name') ?></span></label>
                <div class="control">
                    <input name="name" id="name" title="<?php  echo __('Name') ?>" class="input-text" type="text" data-validate="{required:true}"/>
                </div>
            </div>
            <div class="field email required">
                <label class="label" for="email"><span><?php  echo __('Email') ?></span></label>
                <div class="control">
                    <input name="email" id="email" title="<?php  echo __('Email') ?>" class="input-text" type="text" data-validate="{required:true}"/>
                </div>
            </div>
            <div class="field phone_no">
                <label class="label" for="phone_no"><span><?php  echo __('Contact No') ?></span></label>
                <div class="control">
                    <input name="phone_no" id="phone_no" title="<?php  echo __('Contact No') ?>" class="input-text" type="text"/>
                </div>
            </div>
            <div class="field message">
                <label class="label" for="message"><span><?php  echo __('Message') ?></span></label>
                <div class="control">
                    <input name="message" id="message" title="<?php  echo __('Message') ?>" class="input-text" type="text"/>
                </div>
            </div>
        </fieldset>

        <div class="actions-toolbar">
            <div class="primary">
                <input type="hidden" name="hideit" id="hideit" value="" />
                <button type="submit" title="<?php  echo __('Submit') ?>" class="action submit primary" id="custom_btn">
                    <span><?php  echo __('Submit') ?></span>
                </button>
            </div>
        </div>
   </form>
</div>
Now, create a controller for the save action. Create file Save.php in app/code/Dolphin/MyModule/Controller/Index folder with the following code.
<?php

namespace Dolphin\MyModule\Controller\Index;

class Save extends \Magento\Framework\App\Action\Action
{
     protected $_pageFactory;
     protected $_contactFactory;

     public function __construct(
          \Magento\Framework\App\Action\Context $context,
          \Magento\Framework\View\Result\PageFactory $pageFactory,
          \Dolphin\MyModule\Model\ContactFactory $contactFactory
     ){
          $this->_pageFactory = $pageFactory;
          $this->_contactFactory = $contactFactory;
          return parent::__construct($context);
     }

     public function execute()
     {
          if ($this->getRequest()->isPost()) {
               $input = $this->getRequest()->getPostValue();
               $postData = $this->_contactFactory->create();
               if (isset($input['editId'])) {
                    $id = $input['editId'];
               } else {
                    $id = 0;
               }
               if($id != 0){
                    $postData->load($id);
                    $postData->addData($input);
                    $postData->setId($id);
                    $postData->save();
               }else{
                    $postData->setData($input)->save();
               }
               $this->messageManager->addSuccessMessage("Data added successfully!");
               return $this->_redirect('mymodule/index/index');
          }
          return $this->_redirect('mymodule/index/index');
     }
}
Step 5: Update Data
Create a controller for the edit action. Create file Edit.php in app/code/Dolphin/MyModule/Controller/Index folder with the following code.
<?php

namespace Dolphin\MyModule\Controller\Index;

class Edit extends \Magento\Framework\App\Action\Action
{
     protected $_pageFactory;
     protected $_request;
     protected $_coreRegistry;

     public function __construct(
          \Magento\Framework\App\Action\Context $context,
          \Magento\Framework\View\Result\PageFactory $pageFactory,
          \Magento\Framework\App\Request\Http $request,
          \Magento\Framework\Registry $coreRegistry
     ){
          $this->_pageFactory = $pageFactory;
          $this->_request = $request;
          $this->_coreRegistry = $coreRegistry;
          return parent::__construct($context);
     }

     public function execute()
     {
        $id = $this->_request->getParam('id');
        $this->_coreRegistry->register('editId', $id);
          return $this->_pageFactory->create();
     }
}
Create layout file mymodule_index_edit.xml in app/code/Dolphin/MyModule/view/frontend/layout folder with the following code.
<?xml version="1.0"?>
<page xmlns:xsi="http://www.w3.org/2001/XMLSchema-instance"
     xsi:noNamespaceSchemaLocation="urn:magento:framework:View/Layout/etc/page_configuration.xsd">
    <referenceContainer name="content">
        <block class="Dolphin\MyModule\Block\Edit" name="mymodule_index_edit" template="Dolphin_MyModule::editData.phtml" />
    </referenceContainer>
</page>
Create block file Edit.php in app/code/Dolphin/MyModule/Block folder with the following code.
<?php

namespace Dolphin\MyModule\Block;

class Edit extends \Magento\Framework\View\Element\Template
{
     protected $_pageFactory;
     protected $_coreRegistry;
     protected $_contactLoader;

     public function __construct(
          \Magento\Framework\View\Element\Template\Context $context,
          \Magento\Framework\View\Result\PageFactory $pageFactory,
          \Magento\Framework\Registry $coreRegistry,
          \Dolphin\MyModule\Model\ContactFactory $contactLoader,
          array $data = []
     ){
          $this->_pageFactory = $pageFactory;
          $this->_coreRegistry = $coreRegistry;
          $this->_contactLoader = $contactLoader;
          return parent::__construct($context,$data);
     }

     public function execute()
     {
          return $this->_pageFactory->create();
     }

     public function getEditData()
     {
          $id = $this->_coreRegistry->registry('editId');
          $postData = $this->_contactLoader->create();
          $result = $postData->load($id);
          $result = $result->getData();
          return $result;
     }
}
Create template file editData.phtml in app/code/Dolphin/MyModule/view/frontend/templates folder with the following code.
<?php

namespace Dolphin\MyModule\Block;

class Edit extends \Magento\Framework\View\Element\Template
{
     protected $_pageFactory;
     protected $_coreRegistry;
     protected $_contactLoader;

     public function __construct(
          \Magento\Framework\View\Element\Template\Context $context,
          \Magento\Framework\View\Result\PageFactory $pageFactory,
          \Magento\Framework\Registry $coreRegistry,
          \Dolphin\MyModule\Model\ContactFactory $contactLoader,
          array $data = []
     ){
          $this->_pageFactory = $pageFactory;
          $this->_coreRegistry = $coreRegistry;
          $this->_contactLoader = $contactLoader;
          return parent::__construct($context,$data);
     }

     public function execute()
     {
          return $this->_pageFactory->create();
     }

     public function getEditData()
     {
          $id = $this->_coreRegistry->registry('editId');
          $postData = $this->_contactLoader->create();
          $result = $postData->load($id);
          $result = $result->getData();
          return $result;
     }
}
Run the command for cache clean and check the result with URL yourdomain/mymodule/index/index.
Add on: Delete Customer Account for Magento 2
Step 6: Delete Data
Create Controller file for the Delete data. Create Delete.php file in app/code/Dolphin/MyModule/Controller/Index folder with the following code.
<?php

namespace Dolphin\MyModule\Controller\Index;

class Delete extends \Magento\Framework\App\Action\Action
{
     protected $_pageFactory;
     protected $_request;
     protected $_contactFactory;

     public function __construct(
          \Magento\Framework\App\Action\Context $context,
          \Magento\Framework\View\Result\PageFactory $pageFactory,
          \Magento\Framework\App\Request\Http $request,
          \Dolphin\MyModule\Model\ContactFactory $contactFactory
     ){
          $this->_pageFactory = $pageFactory;
          $this->_request = $request;
          $this->_contactFactory = $contactFactory;
          return parent::__construct($context);
     }

     public function execute()
     {
          $id = $this->_request->getParam('id');
          $postData = $this->_contactFactory->create();
          $result = $postData->setId($id);
          $result = $result->delete();
          return $this->_redirect('mymodule/index/index');
     }
}
Run the command for cache clean and check the result with URL yourdomain/mymodule/index/index.
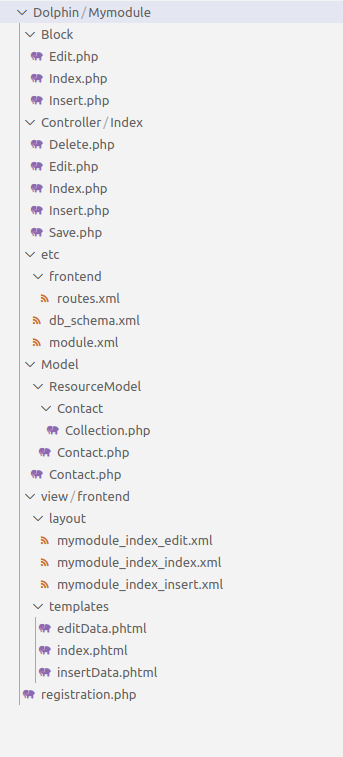
So after following all the steps your final directory structure would look like below.
 We hope our guide is very effective for you. If any questions, please feel free to leave a comment below. In the next tutorial, you will help with how to create UI Form and UI Grid in Magento 2.

We can help you with
- Dedicated Team
- Setup Extended Team
- Product Development
- Custom App Development
Our Offices

AHMEDABAD (INDIA)
B- 203-206, Empire Business Hub, Science City Road, Sola, Ahmedabad – 380060

BERLIN (GERMANY)
Badensche Str. 28, 10715 Berlin, Germany

CALIFORNIA (USA)
9601 Reseda Blvd, Apt#223, Northridge CA-91324, USA

ALBERTA (CANADA)
302 Skyview Ranch Drive NE, Calgary, Alberta, Canada T3N0P5


Hello!
Click one of our contacts below to chat on WhatsApp