How to create Category Page Layout in Magento.

In this article. we will create a new category page layout and use that layout using the custom category attributes in Magento.
To begin with, why would you need to add a custom layout to a category? You may need to accomplish one of the following:
- customize some CSS for that specific type of page
- insert more page information (like blocks and containers via layout)
- Add some custom JS to the page, such as tracking scripts and tracking pixels.
We’ll utilize events and observers to add a custom layout to the category page — it’s only one technique to extend Magento 2 capability. and we’ll use the layout_load_before because there is no other point (for categories) to append a custom layout until the page is rendered.
Please follow the below steps to know how to update the category page layout for a specific category using a custom attribute in Magento 2.
Step 1: This article assumes the reader is familiar with Magento 2 modules and how they work. If not, it is highly recommended to read the documentation first. All files mentioned below must be placed inside a module.
Step 2: Create InstallData.php at app/code/Dolphin/CustomModule/Setup/
Inside the file, we create the custom category attribute code as shown below:
<?php
/**
 * Created By: Dolphin Web Solution Pvt. Ltd.
 */

namespace Dolphin\CustomModule\Setup;

use Magento\Eav\Setup\EavSetupFactory;
use Magento\Framework\Setup\InstallDataInterface;
use Magento\Framework\Setup\ModuleContextInterface;
use Magento\Framework\Setup\ModuleDataSetupInterface;

class InstallData implements InstallDataInterface {
    private $eavSetupFactory;

    public function __construct(EavSetupFactory $eavSetupFactory) {
        $this->eavSetupFactory = $eavSetupFactory;
    }

    public function install(ModuleDataSetupInterface $setup, ModuleContextInterface $context) {
        $eavSetup = $this->eavSetupFactory->create(['setup' => $setup]);
        $eavSetup->addAttribute(\Magento\Catalog\Model\Category::ENTITY, 'custom_layout', [
            'type' => 'int',
            'label' => 'Custom Layout',
            'input' => 'boolean',
            'source' => 'Magento\Eav\Model\Entity\Attribute\Source\Boolean',
            'visible' => true,
            'default' => '0',
            'required' => false,
            'global' => \Magento\Eav\Model\Entity\Attribute\ScopedAttributeInterface::SCOPE_STORE,
            'group' => 'Display Settings',
        ]);
    }
}
Step 3: Create category_form.xml at app/code/Dolphin/CustomModule/view/adminhtml/ui_component/
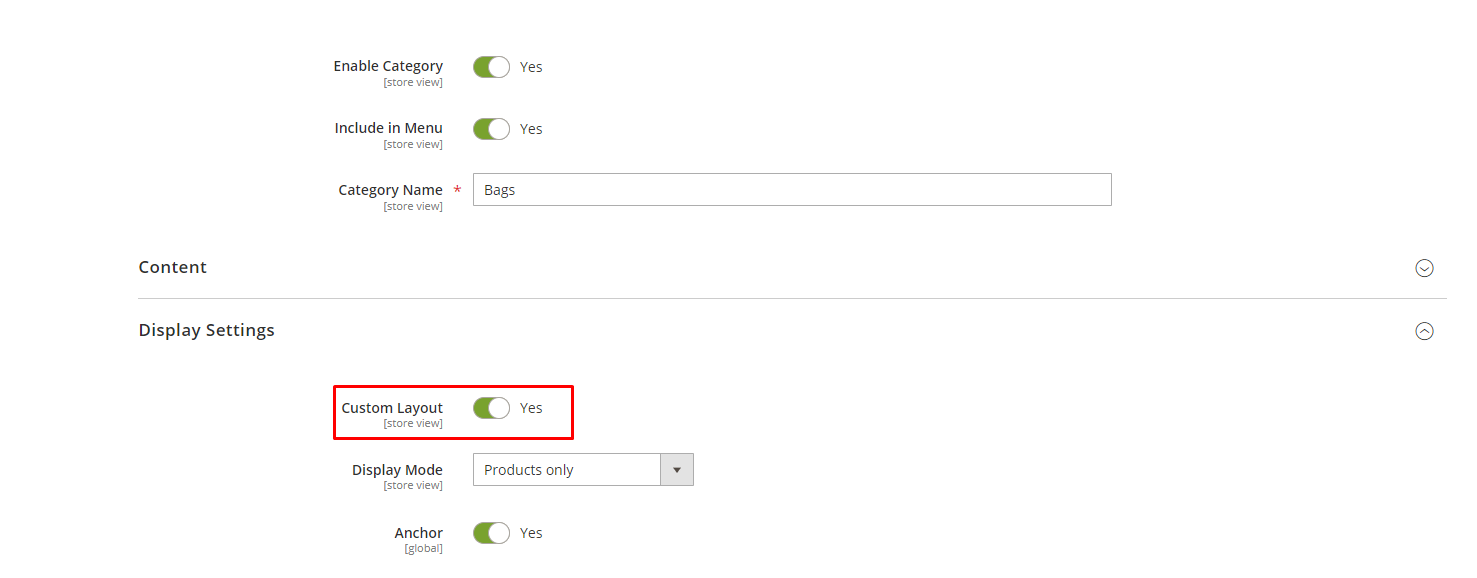
Inside the file, we display the Custom Category attribute on the Display Settings tab in the Admin Side Category View page as shown below:
<?xml version="1.0"?>
<!--
/**
 * Created By: Dolphin Web Solution Pvt. Ltd.
 */
-->
<form xmlns:xsi="http://www.w3.org/2001/XMLSchema-instance" xsi:noNamespaceSchemaLocation="urn:magento:module:Magento_Ui:etc/ui_configuration.xsd">
    <fieldset name="display_settings">
        <field name="custom_layout">
            <argument name="data" xsi:type="array">
                <item name="config" xsi:type="array">
                    <item name="dataType" xsi:type="string">boolean</item>
                    <item name="formElement" xsi:type="string">checkbox</item>
                    <item name="label" xsi:type="string" translate="true">Custom Layout</item>
                    <item name="prefer" xsi:type="string">toggle</item>
                    <item name="valueMap" xsi:type="array">
                        <item name="true" xsi:type="string">1</item>
                        <item name="false" xsi:type="string">0</item>
                    </item>
                    <item name="default" xsi:type="number">0</item>
                </item>
            </argument>
        </field>
    </fieldset>
</form>
Now, this is complete to use as a custom layout. You can check this layout in the admin panel configuration setting.
Step 4: Create events.xml at app/code/Dolphin/CustomModule/etc/frontend/
Inside the file, we use the layout_load_before code as shown below:
<?xml version="1.0"?>
<!--
/**
 * Created By: Dolphin Web Solution Pvt. Ltd.
 */
-->

<config xmlns:xsi="http://www.w3.org/2001/XMLSchema-instance" xsi:noNamespaceSchemaLocation="urn:magento:framework:Event/etc/events.xsd">
    <event name="layout_load_before">
        <observer name="category_custom_layout" instance="Dolphin\CustomModule\Observer\Categorycustomlayout" />
    </event>
</config>
Step 5: Create Categorycustomlayout.php at app/code/Dolphin/CustomModule/Observer/
Inside the file, we check the category attribute is enabled/disabled and add the layout handle for page layout code as shown below:
<?php
/**
 * Created By: Dolphin Web Solution Pvt. Ltd.
 */
namespace Dolphin\CustomModule\Observer;

use Magento\Framework\Event\Observer;
use Magento\Framework\Event\ObserverInterface;
use Magento\Framework\Registry;

class Categorycustomlayout implements ObserverInterface {
    const ACTION_NAME = 'catalog_category_view';

    /** @var Registry */
    private $registry;

    public function __construct(
        Registry $registry
    ) {
        $this->registry = $registry;
    }

    public function execute(Observer $observer) {
        if ($observer->getFullActionName() !== self::ACTION_NAME) {
            return;
        }

        $category = $this->registry->registry('current_category');

        /** @var \Magento\Framework\View\Layout $layout */
        if ($category->getCustomLayout()) {
            $layout = $observer->getLayout();
            $layout->getUpdate()->addHandle('catalog_category_custom_view');
        } else {
            return true;
        }
    }
}
Step 6: Create catalog_category_custom_view.xml at app/code/Dolphin/CustomModule/view/frontend/layout/
Inside the file, we remove the sidebar wishlist and custom class code as shown below:
<?xml version="1.0"?>
<!--
/**
 * Created By: Dolphin Web Solution Pvt. Ltd.
 */
-->

<config xmlns:xsi="http://www.w3.org/2001/XMLSchema-instance" xsi:noNamespaceSchemaLocation="urn:magento:framework:Event/etc/events.xsd">
    <event name="layout_load_before">
        <observer name="category_custom_layout" instance="Dolphin\CustomModule\Observer\Categorycustomlayout" />
    </event>
</config>
Conclusion
As you can look from these simple examples, it’s easy to customize the page using a custom layout. Apply some CSS for styling and you’ll have your new page layout with new customized content a couple of times.
You may also like to read
That’s it!
I hope this technical blog will help you to find what you were looking for.
That’s all, If you have any further questions about Magento 2 theme development or if need any help from our Magento 2 expert, contact us now for a free consultation.
Bookmark it for your future reference. Do comment below if you have any other questions.
P.S. Do share this note with your team.

We can help you with
- Dedicated Team
- Setup Extended Team
- Product Development
- Custom App Development
Our Offices

AHMEDABAD (INDIA)
B- 203-206, Empire Business Hub, Science City Road, Sola, Ahmedabad – 380060

BERLIN (GERMANY)
Badensche Str. 28, 10715 Berlin, Germany

CALIFORNIA (USA)
9601 Reseda Blvd, Apt#223, Northridge CA-91324, USA

ALBERTA (CANADA)
302 Skyview Ranch Drive NE, Calgary, Alberta, Canada T3N0P5


Hello!
Click one of our contacts below to chat on WhatsApp