How To Setup Cron Time In Magento 2 System Configuration

The cron Job will create a command or a script that is appropriate with the task you want to do. Instead of manual working, the Cron Job allows running automatically in exact time and date. Due to its automation, the Cron Jobs is the perfect choice for repeated projects every date or every week.
Cron configuration is very important in Magento to set the schedule for many system activities such as reindexing, auto-update of currency rates, Magento emails, etc. Only when the configuration is correct, the cron job is active. In case there is an error, this means Magento won’t function as expected.
The system.xml is a configuration file which is used to create configuration fields in Magento 2 System Configuration. You will need this if your module has some settings which the admin needs to set. You can go to Store -> Setting -> Configuration to check how it look like.
Steps to Setup Dynamically Schedule Cron Job in System Configurations Magento 2
We are already learned how to create a basic module in Magento 2. We need to create module.xml and registration.php files. You can create module.xml and registration.php from this tutorial.
Here we are using Dolphin as Vendor name and InvoiceEmail as the name of the module. You can change this according to your Vendor and Module name.
Step 1: Create System XML
Create system config file system.xml in app/code/Dolphin/InvoiceEmail/etc/adminhtml folder with the following code.
<?xml version="1.0"?>
<config xmlns:xsi="http://www.w3.org/2001/XMLSchema-instance"
        xsi:noNamespaceSchemaLocation="urn:magento:module:Magento_Config:etc/system_file.xsd">
    <system>
        <tab id="dolphintab" translate="label" sortOrder="100">
            <label>Dolphin</label>
        </tab>
        <section id="setting" translate="label" type="text" sortOrder="10" showInDefault="1" showInWebsite="1"
                 showInStore="1">
            <class>separator-top</class>
            <label>Settings</label>
            <tab>dolphintab</tab>
            <resource>Dolphin_InvoiceEmail::config_extension</resource>
            <group id="general" translate="label" type="text" sortOrder="10" showInDefault="1" showInWebsite="1"
                   showInStore="1">
                <label>General</label>
                <field id="frequency" translate="label" type="select" sortOrder="1" showInDefault="1" showInWebsite="0"
                       showInStore="0">
                    <label>Frequency</label>
                    <source_model>Magento\Cron\Model\Config\Source\Frequency</source_model>
                    <backend_model>Dolphin\InvoiceEmail\Model\Config\Cronconfig</backend_model>
                </field>
                <field id="time" translate="label comment" sortOrder="2" type="time" showInDefault="1" showInWebsite="1"
                       showInStore="1">
                    <label>Start Time</label>
                </field>
            </group>
        </section>
    </system>
</config>
The magento 2 system configuration page is divided logically into a few parts: Tabs, Sections, Groups, Fields.
The system.xml is located in app/code/Dolphin/InvoiceEmail/etc/adminhtml folder of the module, we will create a new Tab for our vendor “Dolphin”, a new Section for our module “Settings“, a Group to contain “General” simple fields: Frequency and Start Time
Step 2: Create Backend Model Class
Create Editor class in file Cronconfig.php in app/code/Dolphin/InvoiceEmail/Model/Config folder with the following code.
<?php

namespace Dolphin\InvoiceEmail\Model\Config;

class Cronconfig extends \Magento\Framework\App\Config\Value
{
    const CRON_STRING_PATH = 'crontab/default/jobs/cron_name/schedule/cron_expr';
    const CRON_MODEL_PATH = 'crontab/default/jobs/cron_name/run/model';

    /**
     * @var \Magento\Framework\App\Config\ValueFactory
     */

    protected $_configValueFactory;

    /**
     * @var mixed|string
     */

    protected $_runModelPath = '';

    /**
     * CronConfig1 constructor.
     * @param \Magento\Framework\Model\Context $context
     * @param \Magento\Framework\Registry $registry
     * @param \Magento\Framework\App\Config\ScopeConfigInterface $config
     * @param \Magento\Framework\App\Cache\TypeListInterface $cacheTypeList
     * @param \Magento\Framework\App\Config\ValueFactory $configValueFactory
     * @param \Magento\Framework\Model\ResourceModel\AbstractResource|null $resource
     * @param \Magento\Framework\Data\Collection\AbstractDb|null $resourceCollection
     * @param string $runModelPath
     * @param array $data
     */

    public function __construct(
        \Magento\Framework\Model\Context $context,
        \Magento\Framework\Registry $registry,
        \Magento\Framework\App\Config\ScopeConfigInterface $config,
        \Magento\Framework\App\Cache\TypeListInterface $cacheTypeList,
        \Magento\Framework\App\Config\ValueFactory $configValueFactory,
        \Magento\Framework\Model\ResourceModel\AbstractResource $resource = null,
        \Magento\Framework\Data\Collection\AbstractDb $resourceCollection = null,
        $runModelPath = '',
        array $data = [])
    {
        $this->_runModelPath = $runModelPath;
        $this->_configValueFactory = $configValueFactory;
        parent::__construct($context, $registry, $config, $cacheTypeList, $resource, $resourceCollection, $data);
    }

    /**
     * @return CronConfig1
     * @throws \Exception
     */

    public function afterSave()
    {
        $time = $this->getData('groups/general/fields/time/value');
        $frequency = $this->getData('groups/general/fields/frequency/value');
        $cronExprArray = [
            intval($time[1]),
            intval($time[0]),
            $frequency == \Magento\Cron\Model\Config\Source\Frequency::CRON_MONTHLY ? '1' : '*',
            '*',
            $frequency == \Magento\Cron\Model\Config\Source\Frequency::CRON_WEEKLY ? '1' : '*',
        ];

        $cronExprString = join(' ', $cronExprArray);

        try {
            $this->_configValueFactory->create()->load(
                self::CRON_STRING_PATH,
                'path'
            )->setValue(
                $cronExprString
            )->setPath(
                self::CRON_STRING_PATH
            )->save();
            $this->_configValueFactory->create()->load(
                self::CRON_MODEL_PATH,
                'path'
            )->setValue(
                $this->_runModelPath
            )->setPath(
                self::CRON_MODEL_PATH
            )->save();
        } catch (\Exception $e) {
            throw new \Exception(__('Some Thing Want Wrong'));
        }
        return parent::afterSave();
    }
}
Step 3: Create Crontab xml
Create Crontab xml in file crontab.xml in app/code/Dolphin/InvoiceEmail/etc folder with the following code.
<?xml version="1.0"?>
<config xmlns:xsi="http://www.w3.org/2001/XMLSchema-instance"
        xsi:noNamespaceSchemaLocation="urn:magento:module:Magento_Cron:etc/crontab.xsd">
    <group id="default">
        <job instance="Dolphin\InvoiceEmail\Cron\UpdateStock" method="execute" name="cron_name">
            <config_path>crontab/default/jobs/cron_name/schedule/cron_expr</config_path>
        </job>
    </group>
</config>
- group id is your cron group name. You can run only cron for single group at a time.
- job instance is a class to be instantiated (classpath (Dolphin\InvoiceEmail\Cron\UpdateStock)).
- job method is the method in job instance to call.
- job name is Unique ID for this cron job.
- schedule is the schedule in cron format.
Step 4: Create Cron Class
Create UpdateStock Class in file UpdateStock.php in app/code/Dolphin/InvoiceEmail/Cron folder with the following code.
<?php

namespace Dolphin\InvoiceEmail\Cron;

class UpdateStock
{
    public function execute()
    {

// add your code
    }
}
Now execute the below command and go to the system configuration page:
[dt_highlight color="" text_color="" bg_color=""]php bin/magento c:c[/dt_highlight]
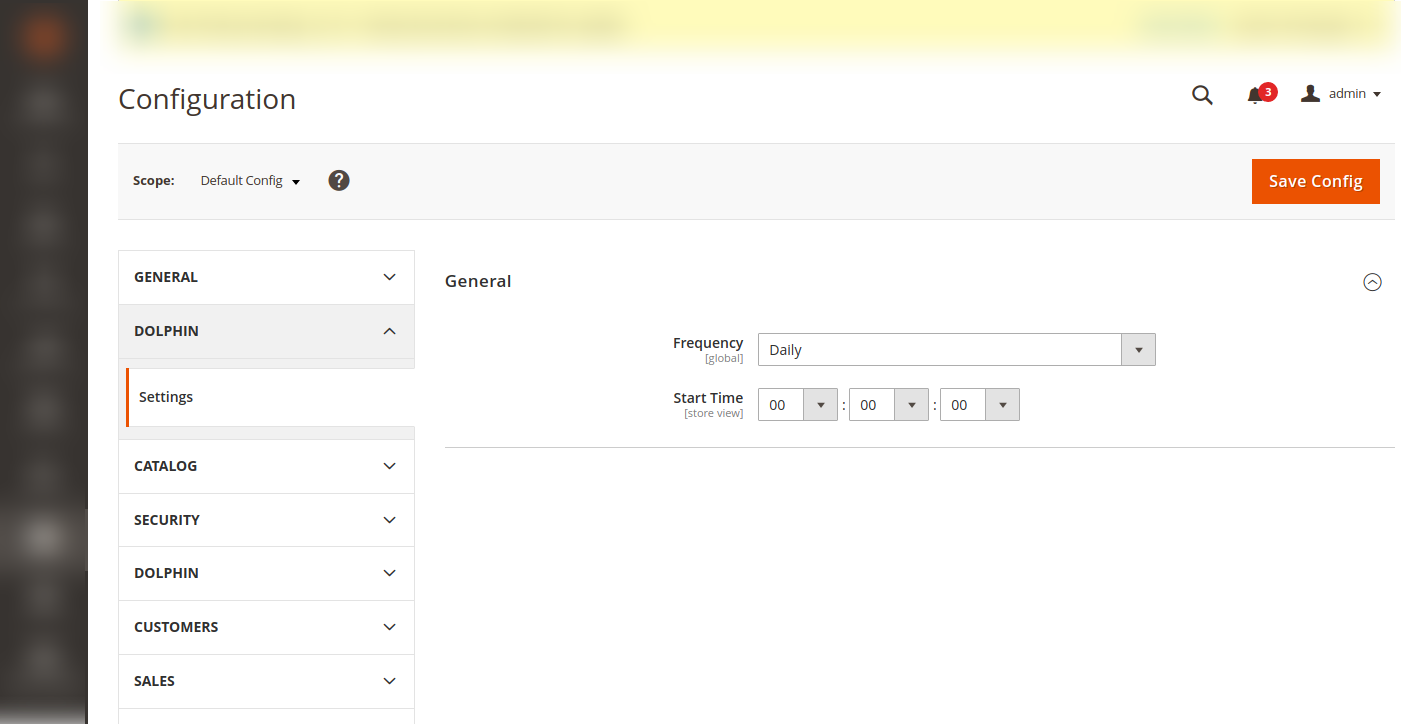
Result:
After you implement the above code, check output in the admin panel of Magento 2. The Cron Frequency and Start Time fields will be displayed in the system configuration.
I Hope, This instruction will be helpful for you.
If you have any difficulties regarding this blog, do consider them posting in the Comments section below!
I’m here to help.
Thank you!

We can help you with
- Dedicated Team
- Setup Extended Team
- Product Development
- Custom App Development
Our Offices

AHMEDABAD (INDIA)
B- 203-206, Empire Business Hub, Science City Road, Sola, Ahmedabad – 380060

BERLIN (GERMANY)
Badensche Str. 28, 10715 Berlin, Germany

CALIFORNIA (USA)
9601 Reseda Blvd, Apt#223, Northridge CA-91324, USA

ALBERTA (CANADA)
302 Skyview Ranch Drive NE, Calgary, Alberta, Canada T3N0P5


Hello!
Click one of our contacts below to chat on WhatsApp