How to set a theme on a specific page in Magento 2


In Magento 2, you can set a specific theme for a particular page using layout_load_before event. This allows you to have different visual styles for different sections of your website. Here’s you can set a theme on a specific page in Magento 2:
While the layout_load_before event can be useful in certain scenarios, you should exercise caution when using it, as it can affect the entire layout rendering process. It’s recommended to utilize more specific layout update events whenever possible to target only the necessary sections of the page layout.
We are already learned how to create a basic module in Magento 2. We need to create module.xml and registration.php files. You can create module.xml and registration.php from this tutorial.
Here we are using Dolphin as the Vendor name and Customize as the name of the module. You can change this according to your Vendor and Module name.
Step 1: Create a routes xml file
Create routes.xml in app/code/Dolphin/Customize/etc/frontend directory with the following code.
<?xml version="1.0"?>
<config xmlns:xsi="http://www.w3.org/2001/XMLSchema-instance" xsi:noNamespaceSchemaLocation="urn:magento:framework:App/etc/routes.xsd">
    <router id="standard">
        <route id="dolphin" frontName="dolphin">
            <module name="Dolphin_Customize"/>
        </route>
    </router>
</config>
Step 2: Create a controller
Create Index.php in app/code/Dolphin/Customize/Controller/Index directory with the following code.
<?php
/**
 * Copyright ©  All rights reserved.
 * See COPYING.txt for license details.
 */
declare(strict_types=1);

namespace Dolphin\Customize\Controller\Index;

use Magento\Framework\App\Action\HttpGetActionInterface;
use Magento\Framework\Controller\ResultInterface;
use Magento\Framework\View\Result\PageFactory;

class Index implements HttpGetActionInterface
{

    /**
     * @var PageFactory
     */
    protected $resultPageFactory;

    /**
     * Constructor
     *
     * @param PageFactory $resultPageFactory
     */
    public function __construct(PageFactory $resultPageFactory)
    {
        $this->resultPageFactory = $resultPageFactory;
    }

    /**
     * Execute view action
     *
     * @return ResultInterface
     */
    public function execute()
    {
        return $this->resultPageFactory->create();
    }
}
Step 3: Create a layout file
Create dolphin_index_index.xml in app/code/Dolphin/Customize/view/frontend/layout directory with the following code.
<?xml version="1.0" ?>
<page xmlns:xsi="http://www.w3.org/2001/XMLSchema-instance" layout="1column" xsi:noNamespaceSchemaLocation="urn:magento:framework:View/Layout/etc/page_configuration.xsd">
    <body>
        <referenceContainer name="content">
            <block name="index.index" class="Dolphin\Customize\Block\Index\Index" template="Dolphin_Customize::index/index.phtml"/>
        </referenceContainer>
    </body>
</page>
Step 4: Create a templates file
Create index.phtml in app/code/Dolphin/Customize/view/frontend/templates/index directory with the following code.
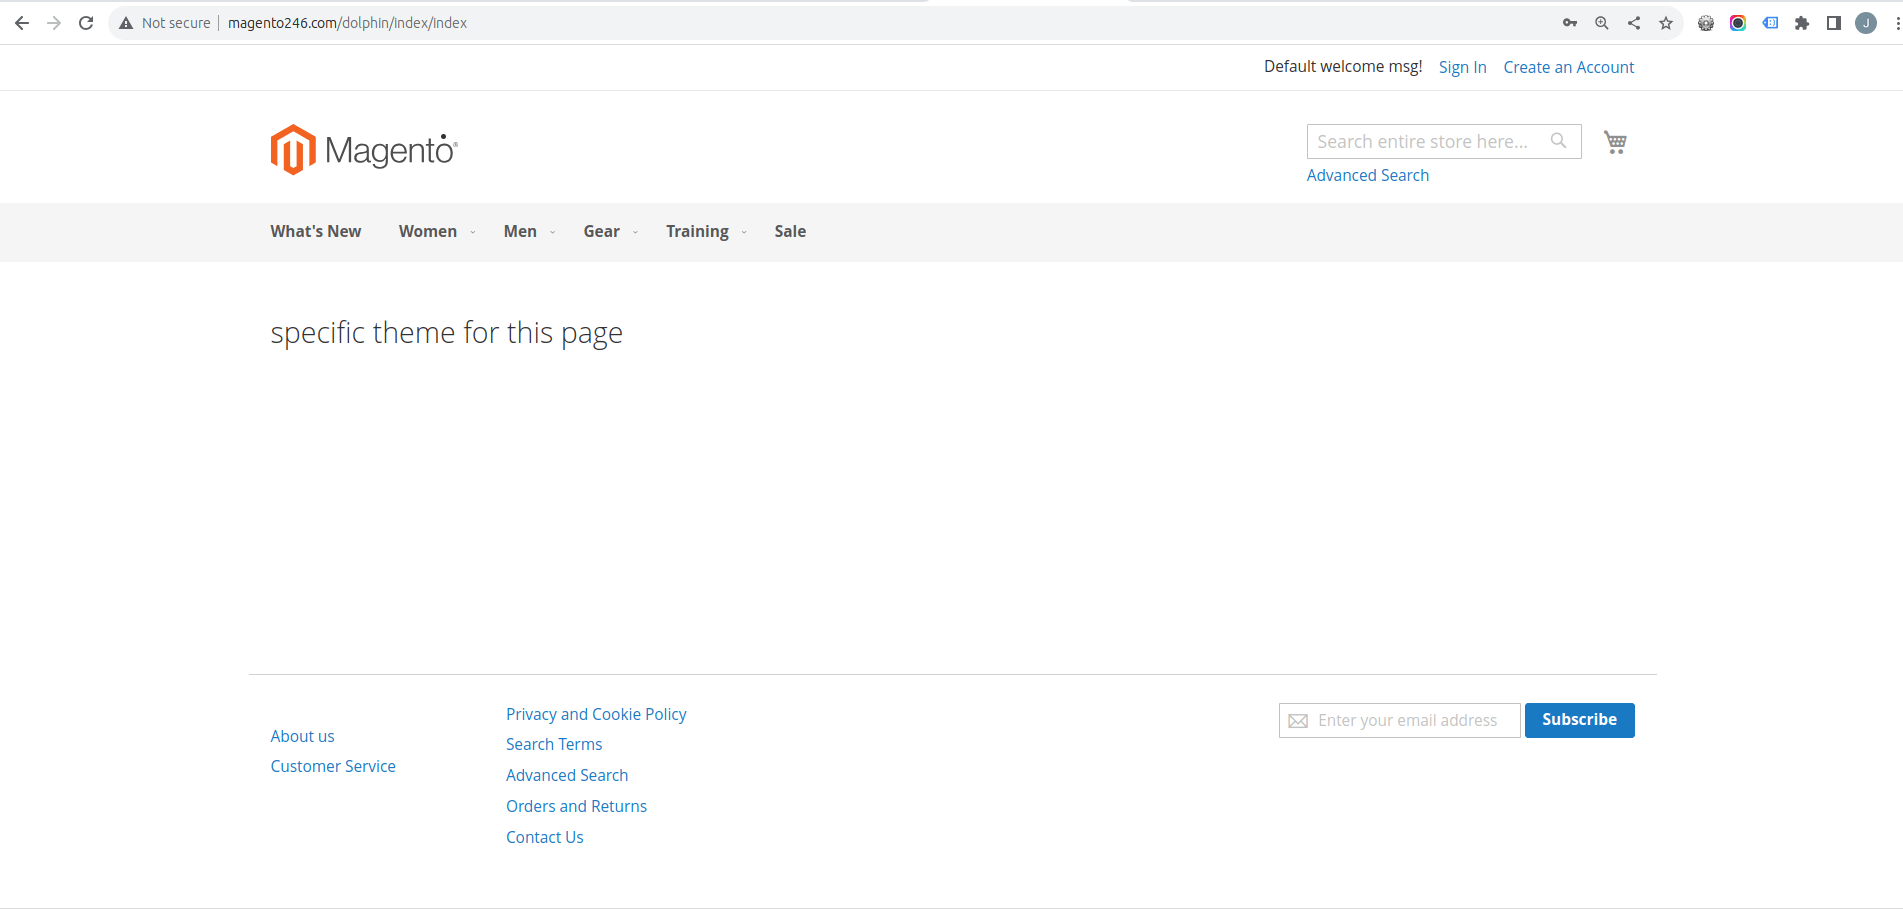
<?php
/**
 * dolphin index template
 *
 * @var $block \Dolphin\Customize\Block\Index\Index
 */
?>

<h2>specific theme for this page</h2>
Step 5: Create a Block class
Create Index.php in app/code/Dolphin/Customize/Block/Index directory with the following code.
<?php
/**
 * Copyright ©  All rights reserved.
 * See COPYING.txt for license details.
 */
declare(strict_types=1);

namespace Dolphin\Customize\Block\Index;

class Index extends \Magento\Framework\View\Element\Template
{

    /**
     * Constructor
     *
     * @param \Magento\Framework\View\Element\Template\Context  $context
     * @param array $data
     */
    public function __construct(
        \Magento\Framework\View\Element\Template\Context $context,
        array $data = []
    ) {
        parent::__construct($context, $data);
    }
}
Step 6: Create an events file
Create events.xml in app/code/Dolphin/Customize/etc directory with the following code.
<?xml version="1.0" encoding="UTF-8"?>
<config xmlns:xsi="http://www.w3.org/2001/XMLSchema-instance" xsi:noNamespaceSchemaLocation="urn:magento:framework:Event/etc/events.xsd">
    <event name="layout_load_before">
        <observer name="dolphin_customize_set_theme_dolphin_page" instance="Dolphin\Customize\Observer\SetThemeForDolphinPage"/>
    </event>
</config>
The layout_load_before event is a generic event that allows you to add or remove layout updates, change block settings, or make any other adjustments to the layout configuration. The layout_load_before event is triggered before the layout file is loaded. can observe the layout_load_before event in their modules to execute their code at this specific point in the layout loading process.
Step 7: Create an observer class file
You need to create the observer class that will handle the layout_load_before event. Create SetThemeForDolphinPage.php in app/code/Dolphin/Customize/Observer directory with the following code.
<?php declare(strict_types=1);

namespace Dolphin\Customize\Observer;

use Magento\Framework\App\Request\Http;
use Magento\Framework\Event\Observer;
use Magento\Framework\Event\ObserverInterface;
use Magento\Framework\View\DesignInterface;

class SetThemeForDolphinPage implements ObserverInterface
{
    /** @var Http */
    private Http $request;

    /** @var DesignInterface  */
    private DesignInterface $design;

    /**
     * @param Http $request
     * @param DesignInterface $design
     */
    public function __construct(
        Http $request,
        DesignInterface $design
    ) {
        $this->request = $request;
        $this->design = $design;
    }

    /**
     * @param Observer $observer
     */
    public function execute(Observer $observer): void
    {
        $pathInfo = $this->request->getPathInfo();
        if (substr($pathInfo, 0, 8) === '/dolphin') {
            $this->design->setDesignTheme('Magento/blank');
        }
        //we add a custom block to the layout before it is loaded.
        /*$layout = $observer->getEvent()->getLayout();
        $layout->addBlock(
            'Magento\Framework\View\Element\Template',
            'custom_block_identifier',
            ['template' => 'Vendor_Module::custom_template.phtml']
        );*/
    }
}
The layout_load_before event is not commonly used, and there are other more specific events available for modifying the layout. It’s essential to use the appropriate events depending on your use case.
Now execute the below command and go to the system configuration page:
php bin/magento s:up
php bin/magento s:d:c
php bin/magento s:s:d -f
php bin/magento c:c
Result:-
I Hope, This instruction will be helpful for you.
If you have any difficulties regarding this blog, do consider posting them in the Comments section below!
I’m here to help.
Thank you!

We can help you with
- Dedicated Team
- Setup Extended Team
- Product Development
- Custom App Development
Our Offices

AHMEDABAD (INDIA)
B- 203-206, Empire Business Hub, Science City Road, Sola, Ahmedabad – 380060

BERLIN (GERMANY)
Badensche Str. 28, 10715 Berlin, Germany

CALIFORNIA (USA)
9601 Reseda Blvd, Apt#223, Northridge CA-91324, USA

ALBERTA (CANADA)
302 Skyview Ranch Drive NE, Calgary, Alberta, Canada T3N0P5


Hello!
Click one of our contacts below to chat on WhatsApp