How to create Modal Dialog in Hyva Theme Magento 2


Hyva Theme is a Magento 2 framework that offers a powerful and flexible platform for eCommerce store development. In this article, we will learn about creating Modal Dialog in Hyva Theme Magento 2.
Steps to Create a Popup Modal in Magento 2 Hyva Theme:
Step 1: Setting up the Layout for Magento 2 Hyva Theme Popup Modal
To create a layout for Magento 2 popup modal in Hyva Theme, follow these steps:
Create a layout folder in the following location:
app/code/[VendorName]/[ModuleName]/view/frontend/layout/
Inside the layout folder, create a hyva_default.xml file and add the following code:
<page xmlns:xsi="http://www.w3.org/2001/XMLSchema-instance" xsi:nonamespaceschemalocation="urn:magento:module:View/Layout:etc/page_configuration.xsd">
    <referencecontainer name="main">
        <block class="Magento\Framework\View\Element\Template" name="modal-dialog" template="[VendorName]_[ModuleName]::modal.phtml">
        </block>
    </referencecontainer>
    <update handle="hyva_modal">
    </update>
</page>
In the code, we define a block within the main container that extends the Magento\Framework\View\Element\Template class. This is done to add our template file.
Finally, the <update handle=”hyva_modal”/> tag is used to load the required JavaScript in the page. This ensures that the modal will work correctly on the page.
Step 2: Creating the Template for Magento 2 Hyva Theme Popup Modal
To create a template for Magento 2 popup modal in Hyva Theme, follow these steps:
Create a template folder in the following location:
app/code/[VendorName]/[ModuleName]/view/frontend/templates/
Add a modal.phtml file to the templates folder and insert the following code:
Method 1:
<?php
/** @var \Magento\Framework\Escaper $escaper */
/** @var \Hyva\Theme\Model\ViewModelRegistry $viewModels */
/** @var \Hyva\Theme\ViewModel\Modal $modalViewModel */
$modalViewModel = $viewModels->require(\Hyva\Theme\ViewModel\Modal::class); ?>
<div x-data="Object.assign({}, hyva.modal(),handleModal())">
<button @click="show" type="button" class="btn mt-40">
<?= $escaper->escapeHtml(__('Open Modal')) ?> </button>
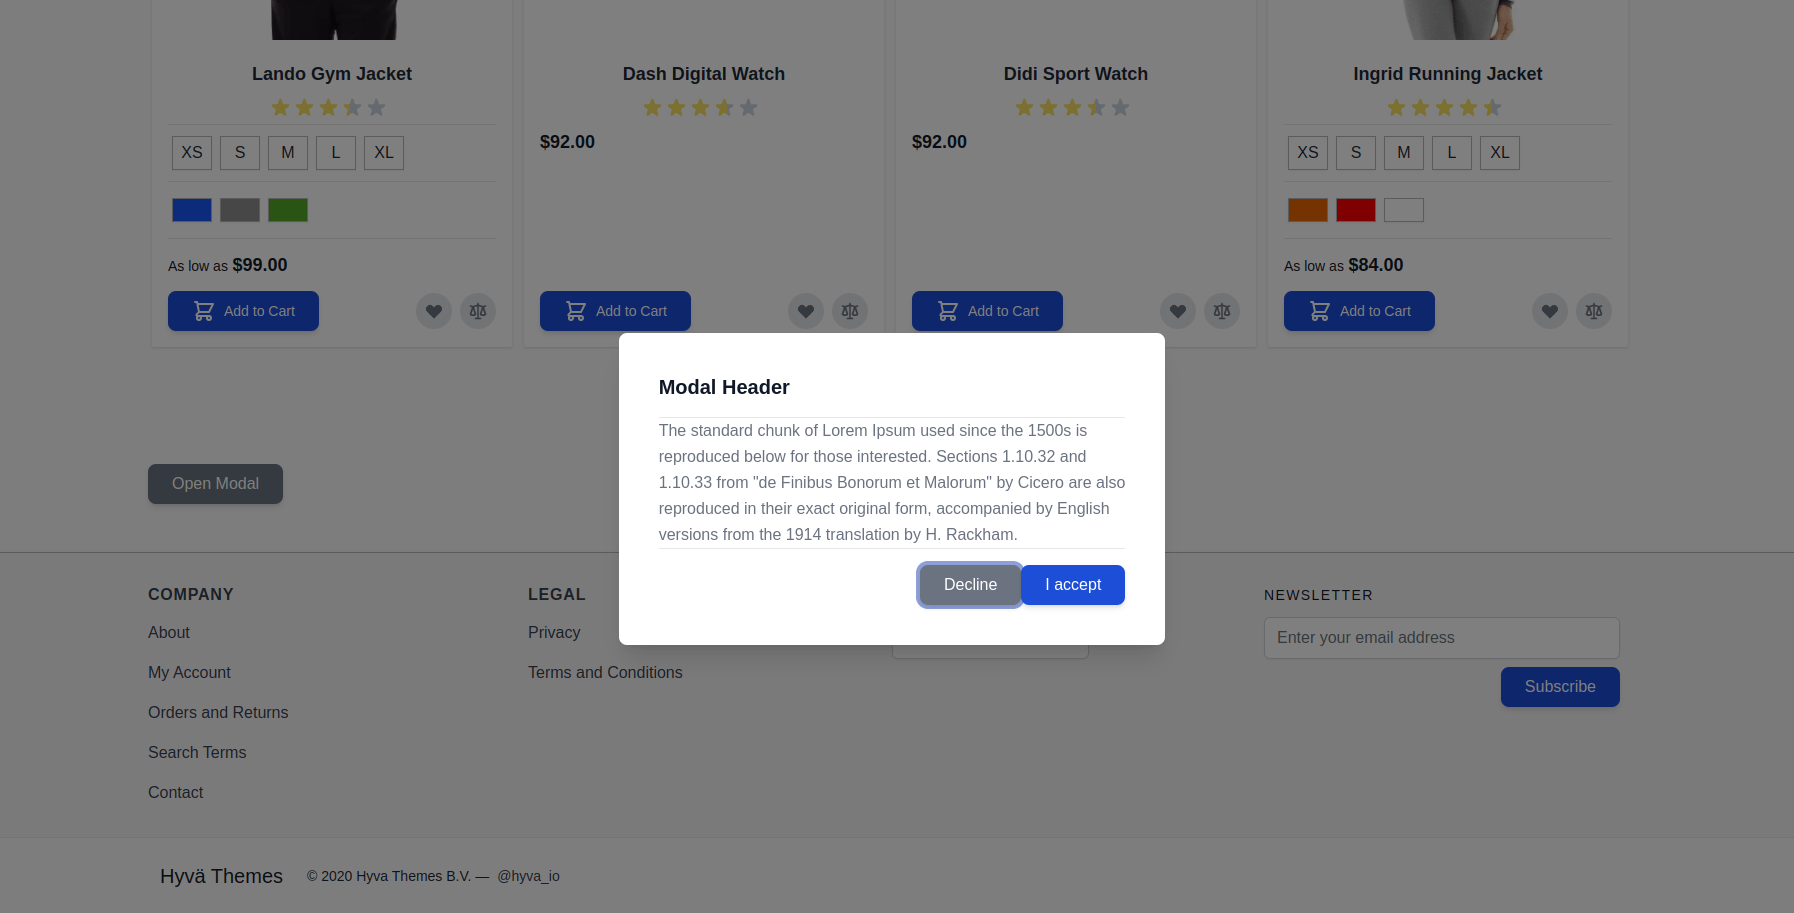
<?= $modalViewModel->createModal()->withContent('
<div class="relative w-full h-full max-w-2xl md:h-auto">
<!-- Modal header -->
<div class="flex items-start justify-start pb-4 border-b rounded-t dark:border-gray-600">
<h3 class="text-xl font-semibold text-gray-900 dark:text-white">
Modal Header
</h3>
</div>
<!-- Modal body -->
<div class="p-6 space-y-6">
<p class="text-base leading-relaxed text-gray-500 dark:text-gray-400">The standard chunk of Lorem Ipsum used since the 1500s is<br>reproduced below for those interested. Sections 1.10.32 and<br>1.10.33 from "de Finibus Bonorum et Malorum" by Cicero are also<br>reproduced in their exact original form, accompanied by English<br>versions from the 1914 translation by H. Rackham.</p>
</div>
<!-- Modal footer -->
<div class="flex items-start justify-end pt-4 border-t rounded-t dark:border-gray-600">
<button @click="hide" type="button" class="btn">'.$escaper->escapeHtml(__('Decline')).'</button>
<button @click="iAccept" type="button" class="btn btn-primary">'.$escaper->escapeHtml(__('Decline')).'</button>
</div>
</div>
<script>
const handleModal = () => {
return{
iAccept(){
// Handle click event
alert();
this.hide();
}
}
}
</script>';
) ?>
</div>
In this code, we first import the required classes and assign them to variables for use later in the code. The $escaper variable is used to escape any HTML code in the popup modal. The $viewModels variable is used to access the Hyva Theme View Model registry, and the $modalViewModel variable is used to access the Hyva Theme View Model for the modal.
Next, we create a main div element with the x-data attribute, which is used to bind the modal to the page. Inside the div, we create a button that triggers the modal to show when clicked, and the modalViewModel->createModal()->withContent() function is used to create the modal and insert its content.
The handleModal function is defined in a script tag, which returns an object with a single property named iAccept, which triggers an alert when called, then hides the modal using the hide function.
The generated modal is displayed when the “Open Modal” button is clicked.
If you have multiple modal dialogs in a single page, you can use $modalViewModel->createModal()->withDialogRefName(‘my-dialog’) to create a unique dialog reference name, and open the modal using show(‘my-dialog’).
The object returned by hyva.modal() has four properties: show(), hide(), overlay(), and isDialogOpen. Be sure not to overwrite them with your custom code.
The isDialogOpen property stores if the modal is visible (true) or hidden (false). The property name might be different, depending on the dialog name, but it will always be called is + dialog name + Open.
Method 2: Using a global function
Sometimes you might want to open a dialog from anywhere on the page, from outside the Alpine dialog component.
It is also possible to declare a global function that can be called from anywhere.
To do this, the Alpine object scope needs to be captured in a global function, so the dialog reference is available.
First, declare the view model as usual:
<?php
$modal = $viewModels->require(\Hyva\Theme\ViewModel\Modal::class)
   ->createModal()
   ->withDialogRefName('my-dialog')
   ->withContent('
   <div class="relative w-full h-full max-w-2xl md:h-auto">

     <!-- Modal header -->
     <div class="flex items-start justify-start pb-4 border-b rounded-t dark:border-gray-600">
        <h3 class="text-xl font-semibold text-gray-900 dark:text-white">
                   Modal Header
               </h3>
     </div>
     <!-- Modal body -->
     <div class="p-6 space-y-6">
           <p class="text-base leading-relaxed text-gray-500 dark:text-gray-400">The standard chunk of Lorem Ipsum used since the 1500s is<br>reproduced below for those interested. Sections 1.10.32 and<br>1.10.33 from "de Finibus Bonorum et Malorum" by Cicero are also<br>reproduced in their exact original form, accompanied by English<br>versions from the 1914 translation by H. Rackham.</p>
       </div>
     <!-- Modal footer -->
     <div class="flex items-start justify-end pt-4 border-t rounded-t dark:border-gray-600">
        <button @click="hide" type="button" class="btn">'.$escaper->escapeHtml(__('Decline')).'</button>
        <button @click="iAccept" type="button" class="btn btn-primary">'.$escaper->escapeHtml(__('I accept')).'</button>
       </div>

   </div>
<script>
  const handleModal = () => {
       return{
           iAccept(){
               // custom logic here
               alert();
               this.hide();
           }
       }

   }
</script>'
   );
?>
Second, when rendering the modal inside the Alpine.js component, add an init() function that captures the component scope in a global function.
<div x-data="{
    ...hyva.modal(),
    init() {
        window.openMyDialog = function (event) {
            this.show('my-dialog', event);
        }.bind(this);
    }
}" x-init="init()">
    <?= $modal ?>
</div>
Here the init function is declared directly inside the x-data attribute and merged onto the view model returned by hyva.modal() using object destructuring but it could be declared just as well in a view model function.
Then, the init function is called with x-init=”init()” (in Alpine v3 that is taken care of automatically).
Now, the dialog can be opened from anywhere on the page by calling window.openMyDialog().
<div>
    <button onclick="openMyDialog()" type="button" class="btn mt-40"><?= $escaper->escapeHtml(__('Open Modal')) ?></button>
</div>
Step 3: Run the Command
- In the last step, run the following commands:
- Clear the cache by the following command:
- php bin/magento c:f OR
- php bin/magento clear:cache
- That’s it! The final result window will look like this:
Happy coding!!

We can help you with
- Dedicated Team
- Setup Extended Team
- Product Development
- Custom App Development
Our Offices

AHMEDABAD (INDIA)
B-203, B-204, Empire Business Hub, Science City Road, Sola, Ahmedabad – 380060

BERLIN (GERMANY)
Badensche Str. 28, 10715 Berlin, Germany

CALIFORNIA (USA)
9601 Reseda Blvd, Apt#223, Northridge CA-91324, USA

ALBERTA (CANADA)
302 Skyview Ranch Drive NE, Calgary, Alberta, Canada T3N0P5


