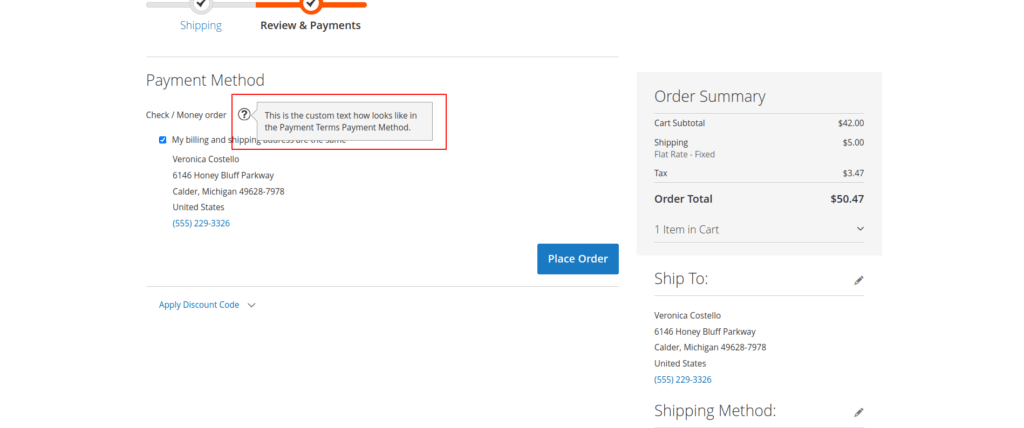
How to add tooltip for Payment methods on checkout page

In Magento 2, tooltips can be added to various elements on the frontend to provide additional information or explanations to users when they hover over those elements. To add a tooltip in Magento 2, you can follow these steps:
- Identify the element: Determine the HTML element to which you want to attach the tooltip. It can be an icon, a link, a button, or any other interactive element.
- Add a tooltip attribute: Add a data attribute named
data-tooltipto the identified element. For example,<a href="#" data-tooltip="This is a tooltip">Hover me</a>. The value of thedata-tooltipattribute will be the content of the tooltip. - Initialize tooltips: Magento 2 uses the Bootstrap framework for its frontend components, including tooltips. To enable tooltips, you need to initialize them using JavaScript. You can do this in your custom JavaScript file or in a script tag within a template file.
-
- If using a JavaScript file, create a file (e.g.,
custom.js) in your theme’s directory, such asapp/design/frontend/YourVendor/YourTheme/web/js/custom.js. Inside the file, add the following code to initialize tooltips:
- If using a JavaScript file, create a file (e.g.,
require(['jquery', 'bootstrap'], function($) {
$(document).ready(function() {
$('[data-tooltip]').tooltip();
});
});
-
- If using a template file, open the template file (e.g.,
.phtmlfile) where the element is located, and add the following script tag:
- If using a template file, open the template file (e.g.,
<script>
require(['jquery', 'bootstrap'], function($) {
$(document).ready(function() {
$('[data-tooltip]').tooltip();
});
});
</script>
Add a tooltip for payment methods on the checkout page in Magento 2, you can follow bellow code on payment HTML file:
<!--
/**
 * Copyright © Magento, Inc. All rights reserved.
 * See COPYING.txt for license details.
 */
-->
<div class="payment-method" data-bind="css: {'_active': (getCode() == isChecked())}">
    <div class="payment-method-title field choice">
        <input type="radio"
               name="payment[method]"
               class="radio"
               data-bind="attr: {'id': getCode()}, value: getCode(), checked: isChecked, click: selectPaymentMethod, visible: isRadioButtonVisible()"/>
        <label data-bind="attr: {'for': getCode()}" class="label"><span data-bind="text: getTitle()"></span></label>
        <span id="payment_terms_css" class="field-tooltip toggle">
                    <span class="field-tooltip-action action-help"
                          data-bind="mageInit: {'dropdown':{'activeClass': '_active'}}"
                          data-toggle="dropdown"
                          aria-haspopup="true"
                          aria-expanded="false">
                     </span>
                    <span class="field-tooltip-content" data-target="dropdown" aria-hidden="true">
                        This is the custom text how looks like in the Payment Terms Payment Method.
                    </span>
                </span>
    </div>
    <div class="payment-method-content">
        <!-- ko foreach: getRegion('messages') -->
        <!-- ko template: getTemplate() --><!-- /ko -->
        <!--/ko-->
        <div class="payment-method-billing-address">
            <!-- ko foreach: $parent.getRegion(getBillingAddressFormName()) -->
            <!-- ko template: getTemplate() --><!-- /ko -->
            <!--/ko-->
        </div>
        <!-- ko if: getMailingAddress() || getPayableTo() -->
        <dl class="items check payable">
            <!-- ko if: getPayableTo() -->
            <dt class="title"><!-- ko i18n: 'Make Check payable to:' --><!-- /ko --></dt>
            <dd class="content"><!-- ko text: getPayableTo() --><!-- /ko --></dd>
            <!-- /ko -->
            <!-- ko if: getMailingAddress() -->
            <dt class="title"><!-- ko i18n: 'Send Check to:' --><!-- /ko --></dt>
            <dd class="content">
                <address class="checkmo mailing address" data-bind="html: getMailingAddress()"></address>
            </dd>
            <!-- /ko -->
        </dl>
        <!-- /ko -->
        <div class="checkout-agreements-block">
            <!-- ko foreach: $parent.getRegion('before-place-order') -->
                <!-- ko template: getTemplate() --><!-- /ko -->
            <!--/ko-->
        </div>
        <div class="actions-toolbar">
            <div class="primary">
                <button class="action primary checkout"
                        type="submit"
                        data-bind="
                        click: placeOrder,
                        attr: {title: $t('Place Order')},
                        css: {disabled: !isPlaceOrderActionAllowed()},
                        enable: (getCode() == isChecked())
                        "
                        disabled>
                    <span data-bind="i18n: 'Place Order'"></span>
                </button>
            </div>
        </div>
    </div>
</div>

<style>
    .payment_terms_css{
        cursor: pointer;
        position: relative !important;
        right: 0;
        top: 1px;
    }
</style>
Clear cache: After making changes to your theme or adding a new JavaScript file, remember to clear the Magento cache for the changes to take effect. You can do this by running the following command in the Magento root directory:
php bin/magento s:up
php bin/magento s:d:c
php bin/magento s:s:d -f
php bin/magento c:c
Result:-

I Hope, This instruction will be helpful for you.
If you have any difficulties regarding this blog, do consider posting them in the Comments section below!
I’m here to help.
Thank you!

Hello!
Click one of our contacts below to chat on WhatsApp
