How to Add Custom Product Image Role in Magento 2

We learn how to add custom product image role into products from Magento 2. Media gallery image roles are mostly used by many users which define different roles to different images which help users to use images according to their requirements. Magento 2 allows creating custom image roles via admin and programmatically.
let’s start with one example, We add two image roles. One for page banner image and second for page left image which is only shown in the page header, not in product media gallery. Our custom images are shown in the product page header section. We have Magento 2 certified developers so If you need you can hire.
Our custom product image Role Names
1)Top Banner
2)Top Banner Left
First We create a basic module if you don’t know then click here.
Step-1: Create registration.php at app/code/Dolphin/CustomImageRole
<?php
use Magento\Framework\Component\ComponentRegistrar;

ComponentRegistrar::register(ComponentRegistrar::MODULE, 'Dolphin_CustomImageRole', __DIR__);
Step-2: Create module.xml at app/code/Dolphin/CustomImageRole/etc
<?xml version="1.0"?>
<config xmlns:xsi="http://www.w3.org/2001/XMLSchema-instance" xsi:noNamespaceSchemaLocation="urn:magento:framework:Module/etc/module.xsd">
    <module name="Dolphin_CustomImageRole" setup_version="1.0.1">
        <sequence>
            <module name="Magento_Catalog"/>
        </sequence>
    </module>
</config>
Step-3: Now we create custom image role attributes. Create InstallData.php at app/code/Dolphin/CustomImageRole/Setup
<?php

namespace Dolphin\CustomImageRole\Setup;

use Magento\Eav\Setup\EavSetupFactory;
use Magento\Framework\Setup\InstallDataInterface;
use Magento\Framework\Setup\ModuleContextInterface;
use Magento\Framework\Setup\ModuleDataSetupInterface;

class InstallData implements InstallDataInterface
{
    private $eavSetupFactory;

    public function __construct(
        EavSetupFactory $eavSetupFactory
    ) {
        $this->eavSetupFactory = $eavSetupFactory;
    }
    public function install(ModuleDataSetupInterface $setup, ModuleContextInterface $context)
    {
        $eavSetup = $this->eavSetupFactory->create(['setup' => $setup]);

        /* Image Type Banner Top */
        $eavSetup->removeAttribute(\Magento\Catalog\Model\Product::ENTITY, 'top_banner_image');
        $eavSetup->addAttribute(
            \Magento\Catalog\Model\Product::ENTITY,
            'top_banner_image',
            [
                'type' => 'varchar',
                'label' => 'Top Banner',
                'input' => 'media_image',
                'frontend' => 'Magento\Catalog\Model\Product\Attribute\Frontend\Image',
                'global' => \Magento\Eav\Model\Entity\Attribute\ScopedAttributeInterface::SCOPE_STORE,
                'filterable' => false,
                'visible_on_front' => false,
                'used_in_product_listing' => false,
                'sort_order' => 100,
                'required' => false,
            ]
        );

        /* Image Type Banner Top Left */
        $eavSetup->removeAttribute(\Magento\Catalog\Model\Product::ENTITY, 'top_banner_left_image');
        $eavSetup->addAttribute(
            \Magento\Catalog\Model\Product::ENTITY,
            'top_banner_left_image',
            [
                'type' => 'varchar',
                'label' => 'Top Banner Left',
                'input' => 'media_image',
                'frontend' => 'Magento\Catalog\Model\Product\Attribute\Frontend\Image',
                'global' => \Magento\Eav\Model\Entity\Attribute\ScopedAttributeInterface::SCOPE_STORE,
                'filterable' => false,
                'visible_on_front' => false,
                'used_in_product_listing' => false,
                'sort_order' => 110,
                'required' => false,
            ]
        );
    }

}
After creating and adding above file run Magento 2 commands
php bin/magento setup:upgrade
php bin/magento setup:static-content:deploy -f
php bin/magento cache:clean
You can see our custom image roles in Product Form in Images And Videos section.
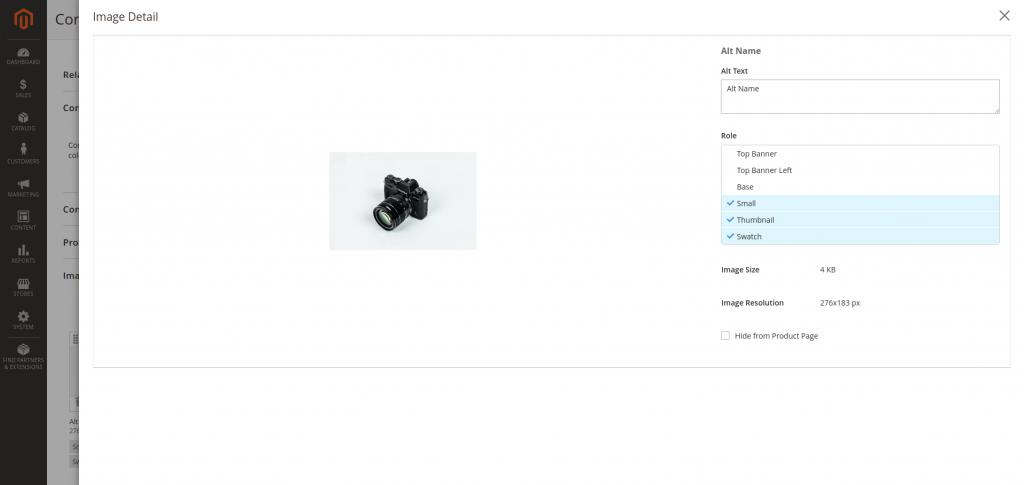
Now you can assign your custom role to image, And also image show on frontend product details page. Now we remove custom assign images from product details page image gallery.
Step-4: Create di.xml at app/code/Dolphin/CustomImageRole/etc
<?xml version="1.0"?>
<config xmlns:xsi="http://www.w3.org/2001/XMLSchema-instance" xsi:noNamespaceSchemaLocation="urn:magento:framework:ObjectManager/etc/config.xsd">

    <type name="Magento\Catalog\Model\Product">
        <plugin name="remove_custom_image_type" type="Dolphin\CustomImageRole\Plugin\Catalog\Model\Product\RemoveImagesToGalleryBlock" sortOrder="1" />
    </type>

</config>
Step-5: Create RemoveImagesToGalleryBlock.php at app/code/Dolphin/CustomImageRole/Plugin/Catalog/Model/Product
<?php

namespace Dolphin\CustomImageRole\Plugin\Catalog\Model\Product;

use Magento\Catalog\Model\Product;After adding the above files you can show custom assign roles images are at top in product page.You can only see images if you assign image to our custom role.
use Magento\Framework\App\Filesystem\DirectoryList;

class RemoveImagesToGalleryBlock
{
    protected $_filesystem;
    protected $_collectionFactory;

    public function __construct(
        \Magento\Framework\Data\CollectionFactory $collectionFactory,
        \Magento\Framework\Filesystem $filesystem
    ) {
        $this->_filesystem = $filesystem;
        $this->_collectionFactory = $collectionFactory;
    }

    public function afterGetMediaGalleryImages(Product $subject, $result)
    {
        $directory = $this->_filesystem->getDirectoryRead(DirectoryList::MEDIA);
        if ($subject->hasData('media_gallery_images')) {
            $subject->setData('media_gallery_images', $this->_collectionFactory->create());
            if (!$subject->getData('media_gallery_images')->count() && is_array($subject->getMediaGallery('images'))) {
                $images = $subject->getData('media_gallery_images');
                foreach ($subject->getMediaGallery('images') as $image) {
                    if (!empty($image['disabled'])
                        || !empty($image['removed'])
                        || empty($image['value_id'])
                        || $images->getItemById($image['value_id']) != null
                    ) {
                        continue;
                    }
                    // check top banner left image
                    if ($image['file'] == $subject->getTopBannerLeftImage()) {
                        continue;
                    }
                    // check top banner image
                    if ($image['file'] == $subject->getTopBannerImage()) {
                        continue;
                    }
                    $image['url'] = $subject->getMediaConfig()->getMediaUrl($image['file']);
                    $image['id'] = $image['value_id'];
                    $image['path'] = $directory->getAbsolutePath($subject->getMediaConfig()->getMediaPath($image['file']));
                    $images->addItem(new \Magento\Framework\DataObject($image));

                }
                $subject->setData('media_gallery_images', $images);
            }
        }
        return $subject->getData('media_gallery_images');
    }
}
After creating above files please run PHP bin/Magento cache: clean command. Now you can check-in product details page our custom image role assign image are not showing in product media gallery.
Now we show our custom assign roles images to product page header section.
Step-6: Create catalog_product_view.xml at app/code/Dolphin/CustomImageRole/view/frontend/layout
<?xml version="1.0"?>
<page layout="1column" xmlns:xsi="http://www.w3.org/2001/XMLSchema-instance" xsi:noNamespaceSchemaLocation="urn:magento:framework:View/Layout/etc/page_configuration.xsd">
    <body>
        <referenceContainer name="page.wrapper">
            <container name="custom.page.top.wrapper" htmlTag="div" htmlClass="custom_page_top_wrapper" after="header.container">
                <container name="custom.page.top" htmlTag="div" htmlClass="custom_page_top">
                    <block class="Magento\Framework\View\Element\Template" name="product.topimage" template="Dolphin_CustomImageRole::product/view/product-topimage.phtml" before="-"/>
                </container>
            </container>
        </referenceContainer>
        <move element="page.main.title" destination="custom.page.top"/>
    </body>
</page>
Step-7: Create product-topimage.phtml at app/code/Dolphin/CustomImageRole/view/frontend/templates/product/view
<?php
$customizeHelper = $this->helper(Dolphin\CustomImageRole\Helper\Data::class);
$productData = $customizeHelper->getCurrentProduct();
$allowed = array('gif', 'png', 'jpg', 'jpeg');
if ($productData) {
    /* Top Banner Image */
    if ($productData->getTopBannerImage()) {
        $filename = $productData->getTopBannerImage();
        $ext = pathinfo($filename, PATHINFO_EXTENSION);
        if (in_array($ext, $allowed)) {
            $topUrl = $customizeHelper->getTopBannerImageUrl($productData->getTopBannerImage());
            ?>
            <div class="top_bg_image" style="background : #FFF url('<?= $block->escapeUrl($topUrl) ?>') no-repeat center;"
                 alt="<?= $block->escapeHtmlAttr($productData->getTopBannerImage()) ?>"> </div>
            <?php
        }
    }

    /* Top Banner Image Left */
    if ($productData->getTopBannerLeftImage()) {
        $filename = $productData->getTopBannerLeftImage();
        $ext = pathinfo($filename, PATHINFO_EXTENSION);
        if (in_array($ext, $allowed)) {
            $topLeftUrl = $customizeHelper->getTopBannerImageUrl($productData->getTopBannerLeftImage());
            ?>
            <div class="product_left_image">
                <img src='<?= $block->escapeUrl($topLeftUrl) ?>' alt="<?= $block->escapeHtmlAttr($productData->getTopBannerLeftImage()) ?>" >
            </div>
            <?php
        }
    }
}
?>
<style>
.custom_page_top {display: block;width: 100%;}
.top_bg_image {min-height: 300px;width: 50%;float: right;}
.product_left_image {display: block;float: left;width: 50%;}
</style>
Step-8: Create Data.php at app/code/Dolphin/CustomImageRole/Helper
<?php

namespace Dolphin\CustomImageRole\Helper;

use Magento\Framework\App\Helper\AbstractHelper;

class Data extends AbstractHelper
{
    protected $storeManager;
    protected $registry;

    public function __construct(
        \Magento\Framework\Registry $registry,
        \Magento\Store\Model\StoreManagerInterface $storeManager
    ) {
        $this->registry = $registry;
        $this->storeManager = $storeManager;
    }

    public function getCurrentProduct()
    {
        return $this->registry->registry('current_product');
    }

    public function getTopBannerImageUrl($imageName)
    {
        $store = $this->storeManager->getStore();
        return $store->getBaseUrl(\Magento\Framework\UrlInterface::URL_TYPE_MEDIA) . 'catalog/product' . $imageName;
    }
}
After adding the above files please run Magento upgrade and cache commands. You can show custom assign roles images are at top of the product details page. You can only see images if you assign images to our custom role.
I hope this helps you. For any doubts regarding this topic, please write your doubts in the comments section.

We can help you with
- Dedicated Team
- Setup Extended Team
- Product Development
- Custom App Development
Our Offices

AHMEDABAD (INDIA)
B-203, B-204, Empire Business Hub, Science City Road, Sola, Ahmedabad – 380060

BERLIN (GERMANY)
Badensche Str. 28, 10715 Berlin, Germany

CALIFORNIA (USA)
9601 Reseda Blvd, Apt#223, Northridge CA-91324, USA

ALBERTA (CANADA)
302 Skyview Ranch Drive NE, Calgary, Alberta, Canada T3N0P5


