How to add attribute options values into dropdown attribute programmatically


In Magento 2, attribute options are used to define the selectable values for dropdown, multiselect, and other similar attributes. These options allow you to provide predefined choices for customers when they are selecting attribute values for products.
Add attribute options values into a dropdown attribute in the Magento 2 Admin panel, following these steps:
- Log in to your Magento 2 Admin panel.
- Navigate to Stores -> Attributes -> Product.
- Find the attribute you want to modify and click on its row to edit it.
- Scroll down to the Manage Labels/Options section.
- Under the Options tab, you’ll see a list of existing attribute options (if any). To add a new option, click on the Add Option button.
- In the Option Value field, enter the label for the new option. For example, if you want to add an option “Option 1”, enter “Option 1” in the field.
- If you want to assign a specific value to the option, you can enter it in the Sort Order field. Otherwise, Magento will assign a value automatically.
- Click on the Save Attribute button to save the changes.
- Repeat steps 5-8 for each additional option you want to add.
- Once you’ve added all the desired options, click on the Save Attribute button to save the attribute.
The attribute options you added will now be available in the dropdown attribute when you create or edit products in the Magento 2 Admin panel. Remember to clear the cache if necessary to see the changes immediately.
Add attribute options values into an exits dropdown attribute in Magento 2 programmatically using CSV, you can follow these steps:
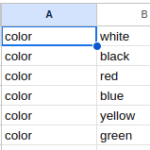
- Create CSV with color and attribute values as shown below & keep your CSV at colorOptions.csv
- Create colorsAttribute.php at Magento 2 root directory and paste the below code & execute the script using the command line
<?php

    ini_set('display_errors', '1');
    ini_set('error_reporting', E_ALL);

    use Magento\Framework\App\Bootstrap;
    require __DIR__ . '/app/bootstrap.php';

    $bootstrap = Bootstrap::create(BP, $_SERVER);
    $objectManager = $bootstrap->getObjectManager();
    $entityType = 'catalog_product';
    $directory = $objectManager->get('\Magento\Framework\Filesystem\DirectoryList');
    $path  =  $directory->getRoot().'/scripts/';
    $objectManager =  \Magento\Framework\App\ObjectManager::getInstance();
    $eavConfig = $objectManager->get('\Magento\Eav\Model\Config');
    $eavSetup = $objectManager->get('\Magento\Eav\Setup\EavSetup');
    $storeManager = $objectManager->get('Magento\Store\Model\StoreManagerInterface');
    $stores = $storeManager->getStores();
    $storeArray[0] = "All Store Views";
    foreach ($stores  as $store)
    {
       $storeArray[$store->getId()] = $store->getName();
    }

    $fname = 'colorOption.csv';

    $file = fopen($path.$fname, "r");
    while (($data = fgetcsv($file, 100000, ",")) !== FALSE)
    {
        foreach((array)$data[0] as $attributeCode)
        {
        $option = array();
        $attribute = $eavConfig->getAttribute($entityType, $attributeCode);
        $option['attribute_id'] = $attribute->getAttributeId();
        $options = $attribute->getSource()->getAllOptions();
        if($data[1])
        {
        foreach((array)$data[1] as $key => $value)
        {
            $str = '"'.$value.'"';
            $option['value'][$str][0]=str_replace('"','', $str);
            foreach($storeArray as $storeKey => $store)
            {
              $option['value'][$str][$storeKey] = str_replace('"','', $str);
            }

        }

        $eavSetup->addAttributeOption($option);


        }
        }
    }
        fclose($file);

    echo "Attribute option values has been associated to color attribute SUCCESSFULLY";
- run Re index from command line php bin/magento indexer:reindex
I Hope, This instruction will be helpful for you.
Happy Coding with magento2!! ?
If you have any difficulties regarding this blog, do consider posting them in the Comments section below!
I’m here to help.
Thank you!

We can help you with
- Dedicated Team
- Setup Extended Team
- Product Development
- Custom App Development
Our Offices

AHMEDABAD (INDIA)
B- 203-206, Empire Business Hub, Science City Road, Sola, Ahmedabad – 380060

BERLIN (GERMANY)
Badensche Str. 28, 10715 Berlin, Germany

CALIFORNIA (USA)
9601 Reseda Blvd, Apt#223, Northridge CA-91324, USA

ALBERTA (CANADA)
302 Skyview Ranch Drive NE, Calgary, Alberta, Canada T3N0P5


Hello!
Click one of our contacts below to chat on WhatsApp