How to Create Custom Command in Console CLI in Magento 2

How to Create Custom Command in Console CLI in Magento 2.
Magento 2, it is being provided default and you create your own custom console CLI command to manage actions, indexes, modules, etc. The new interface performs multiple tasks, including:
- Installing Commerce (and related tasks such as creating or updating the database schema, creating the deployment configuration, and so on).
- Clearing the cache.
- Managing indexes, including reindexing.
- Creating translation dictionaries and translation packages.
- Generating non-existent classes such as factories and interceptors for plug-ins, generating the dependency injection configuration for the object manager.
- Deploying static view files.
- Creating CSS from Less.
Also Like Read: Magento 2 Add Product to cart with a custom price
Custom console command in cli .Taken Dolphin as Package name and CustomCli as Modulename for simplicity. code snippets are under a module named Dolphin_CustomCli.
Before creating the customer tab, we need to create a new module We already have a blog on “how to create a basic module in Magento 2“. We need to create module.xml and registration.php file. You can create module.xml and registration.php from this tutorial.
Step:1 Define Command in di.xml
File: app/code/Dolphin/CustomCli/etc/di.xml
you need to use Magento\Framework\Console\CommandList to define your command option.
<?xml version="1.0" ?>
<config xmlns:xsi="http://www.w3.org/2001/XMLSchema-instance"
        xsi:noNamespaceSchemaLocation="urn:magento:framework:ObjectManager/etc/config.xsd">
    <type name="Magento\Framework\Console\CommandList">
        <arguments>
            <argument name="commands" xsi:type="array">
                <item name="Hellocustom" xsi:type="object">Dolphin\CustomCli\Console\Command\Hellocustom</item>
            </argument>
        </arguments>
    </type>
</config>
This di.xml declare a command class Hellocustom (Dolphin\CustomCli\Console\Command\Hellocustom). This class defines the command name and execute() method.
Step:2 Command Class Hellocustom.php
File: app/code/Dolphin/CustomCli/Console/Command/Hellocustom.php
<?php
namespace Dolphin\CustomCli\Console\Command;

use Symfony\Component\Console\Command\Command;
use Symfony\Component\Console\Input\InputArgument;
use Symfony\Component\Console\Input\InputInterface;
use Symfony\Component\Console\Input\InputOption;
use Symfony\Component\Console\Output\OutputInterface;

class Hellocustom extends Command
{

    const NAME_ARGUMENT = "name";
    const NAME_OPTION = "option";

    /**
     * {@inheritdoc}
     */
    protected function execute(
        InputInterface  $input,
        OutputInterface $output
    )
    {
        $name = $input->getArgument(self::NAME_ARGUMENT);
        $option = $input->getOption(self::NAME_OPTION);
        $output->writeln("Hello " . $name);
    }

    /**
     * {@inheritdoc}
     */
    protected function configure()
    {
        $this->setName("dolphin_customcli:hellocustom");
        $this->setDescription("custom cli command");
        $this->setDefinition([
            new InputArgument(self::NAME_ARGUMENT, InputArgument::OPTIONAL, "Name"),
            new InputOption(self::NAME_OPTION, "-a", InputOption::VALUE_NONE, "Option functionality")
        ]);
        parent::configure();
    }
}
- configure() method is used to set the name, description, command line arguments of the magento 2 add command line
- execute() method will run when we call this command line via console.
Next, we need to check your new command is show in command list.
Magento 2 Below CLI command to see the list of all available Magento 2 commands.
[dt_highlight color=”” text_color=”” bg_color=””]php bin/magento list[/dt_highlight]
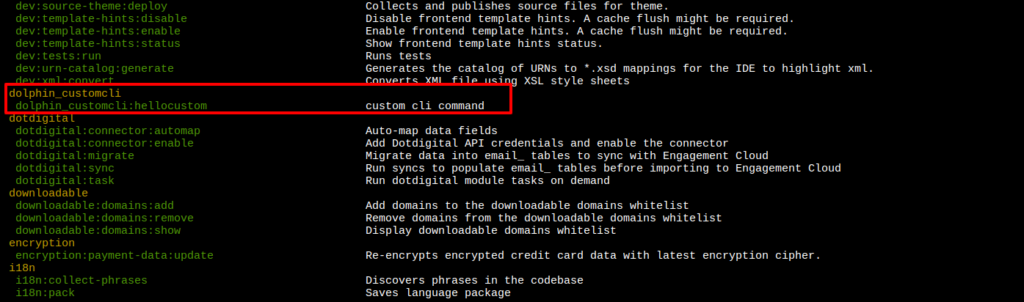
Now you can run [dt_highlight color=”” text_color=”” bg_color=””]php bin/magento dolphin_customcli:hellocustom[/dt_highlight] from the command to see the result:

The CLI command by [dt_highlight color=”” text_color=”” bg_color=””]php bin/magento dolphin_customcli:hellocustom -a ‘jigar’[/dt_highlight] and it will show “Hello jigar” as an output.
![]()
I hope this instruction will be helpful for you.
If you have any difficulties regarding this blog, do consider them posting in the Comments section below!
Thank you!

We can help you with
- Dedicated Team
- Setup Extended Team
- Product Development
- Custom App Development
Our Offices

AHMEDABAD (INDIA)
B-203, B-204, Empire Business Hub, Science City Road, Sola, Ahmedabad – 380060

BERLIN (GERMANY)
Badensche Str. 28, 10715 Berlin, Germany

CALIFORNIA (USA)
9601 Reseda Blvd, Apt#223, Northridge CA-91324, USA

ALBERTA (CANADA)
302 Skyview Ranch Drive NE, Calgary, Alberta, Canada T3N0P5


