Add custom block in cart summary on checkout and cart page in Magento 2

In Magento 2, the cart summary is a section of the website’s shopping cart page and the checkout page that provides an overview of the items added to the cart. It displays essential information related to the products in the cart, such as product names, quantities, prices, subtotal, discounts, taxes, shipping costs, and the grand total.
The cart summary is crucial for customers to review their selected items before proceeding to checkout. It gives them a clear understanding of what they are about to purchase and allows them to make any necessary adjustments, like updating quantities, removing items, or applying discount codes.
Typically, the cart summary is displayed in a tabular format, showing each product in a row, with relevant details in columns. Some essential elements of the cart summary may include:
- Product name and image: A clear identification of the product the customer is buying.
- Quantity: The number of units of each product added to the cart.
- Price: The individual price of each product.
- Subtotal: The total cost of each product line item (quantity multiplied by price).
- Grand Total: The total amount of the entire cart, including all items, taxes, shipping, and discounts.
- Action buttons: Buttons to remove products from the cart or to update the cart after making changes.
In Magento 2, adding a custom block to the cart summary section on the checkout and cart pages can be accomplished by creating a simple module. This module will define a new block and display it in the desired location. Here’s a step-by-step guide to achieving this:
We are already learned how to create a basic module in Magento 2. We need to create module.xml and registration.php files. You can create module.xml and registration.php from this tutorial.
Here we are using Dolphin as Vendor name and Customize as the name of the module. You can change this according to your Vendor and Module name.
Step 1: Create a layout xml file
Create checkout_cart_index.xml in app/code/Dolphin/Customize/view/frontend/layout directory with the following code.
<?xml version="1.0"?>
 <page xmlns:xsi="http://www.w3.org/2001/XMLSchema-instance" xsi:noNamespaceSchemaLocation="urn:magento:framework:View/Layout/etc/page_configuration.xsd">
    <body>
        <referenceContainer name="checkout.cart.totals.container">
            <block class="Magento\Framework\View\Element\Template"
                name="checkout.cart.dolphin.block"
                after="checkout.cart.totals"
                template="Dolphin_Customize::customProduct.phtml" />
        </referenceContainer>
    </body>
 </page>
If you want to display the custom block before the cart totals section, then use before=”checkout.cart.totals” in place of after=”checkout.cart.totals”.
<?xml version="1.0"?>
 <page xmlns:xsi="http://www.w3.org/2001/XMLSchema-instance" xsi:noNamespaceSchemaLocation="urn:magento:framework:View/Layout/etc/page_configuration.xsd">
    <body>
        <referenceContainer name="checkout.cart.totals.container">
            <block class="Magento\Framework\View\Element\Template"
                name="checkout.cart.dolphin.block"
                before="checkout.cart.totals"
                template="Dolphin_Customize::customProduct.phtml" />
        </referenceContainer>
    </body>
 </page>
Step 2: Create a templates file
Create customProduct.phtml in app/code/Dolphin/Customize/view/frontend/templates directory with the following code.
<div class="widget block block-static-block">
<div class="content-heading">
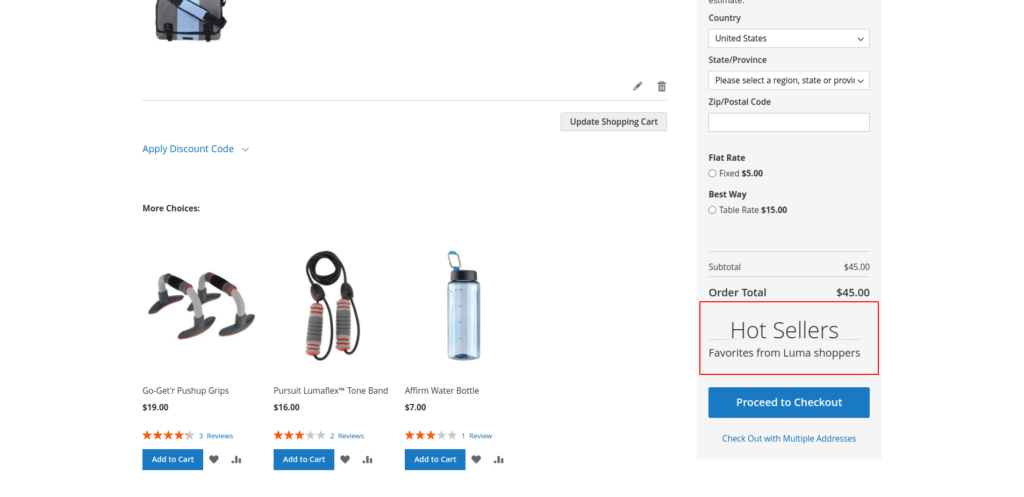
<h2 class="title">Hot Sellers</h2>
<p class="info">Favorites from Luma shoppers</p>
</div>
</div>
Now execute the below command and go to the system configuration page:
php bin/magento s:up
php bin/magento s:d:c
php bin/magento s:s:d -f
php bin/magento c:c
You should now have a custom block displayed in the cart summary on both the cart and checkout pages in Magento 2. Remember that you can customize the content and appearance of the custom block by modifying the customProduct.phtml template file and adding any necessary logic to the block class.
Result:-
I Hope, This instruction will be helpful for you.
If you have any difficulties regarding this blog, do consider posting them in the Comments section below!
I’m here to help.
Thank you!

We can help you with
- Dedicated Team
- Setup Extended Team
- Product Development
- Custom App Development
Our Offices

AHMEDABAD (INDIA)
B- 203-206, Empire Business Hub, Science City Road, Sola, Ahmedabad – 380060

BERLIN (GERMANY)
Badensche Str. 28, 10715 Berlin, Germany

CALIFORNIA (USA)
9601 Reseda Blvd, Apt#223, Northridge CA-91324, USA

ALBERTA (CANADA)
302 Skyview Ranch Drive NE, Calgary, Alberta, Canada T3N0P5


Hello!
Click one of our contacts below to chat on WhatsApp