---
title: "How to set logo in system configuration tab in Magento 2"
url: "https://dolphinwebsolution.com/how-to-set-logo-in-system-configuration-tab-in-magento-2"
date: "2023-06-20T16:52:16+05:30"
modified: "2023-08-29T06:33:49+05:30"
author:
name: "Jigar Patel"
categories:
- "Magento"
- "Magento2"
word_count: 797
reading_time: "4 min read"
summary: "In Magento 2, the \"System Configuration\" tab refers to the section in the Magento Admin Panel where you can configure various settings and options for your Magento store. It provides a user-friendl..."
description: "In Magento 2, the “System Configuration” tab refers to the section in the Magento Admin Panel where you can configure various settings and option..."
keywords: "set logo,system config, Magento, Magento2"
language: "en"
schema_type: "Article"
related_posts:
- title: "How to override template file using helper function in Magento2"
url: "https://dolphinwebsolution.com/how-to-override-template-file-using-helper-function-in-magento2"
- title: "How to Set Custom Validation Message in Magento 2"
url: "https://dolphinwebsolution.com/set-custom-validation-message-in-magento-2"
- title: "How to generate CSS for Hyva theme in Magento 2"
url: "https://dolphinwebsolution.com/how-to-generate-css-for-hyva-theme-in-magento-2"
---
# How to set logo in system configuration tab in Magento 2
_Published: June 20, 2023_
_Author: Jigar Patel_

In Magento 2, the “System Configuration” tab refers to the section in the Magento Admin Panel where you can configure various settings and options for your Magento store. It provides a user-friendly interface for managing the store’s general settings, payment methods, shipping methods, tax settings, email configuration, and more.
To access the System Configuration tab in Magento 2, follow these steps:
1. Log in to the Magento Admin Panel.
2. On the left-hand side, click on “Stores” and then select “Configuration” from the dropdown menu. Alternatively, if you’re using a different Magento edition or version, you might find “System” instead of “Stores”.
3. The System Configuration page will open, displaying a list of available configuration sections and their corresponding settings.
The System Configuration page is organized into different sections, each focusing on a specific aspect of the Magento store. Some commonly used sections include:
- General: Contains general store settings, such as store information, default currency, timezone, and more.
- Sales: Includes settings related to sales, orders, invoices, and payment methods.
- Shipping Methods: Allows configuration of various shipping methods and rates.
- Payment Methods: Allows configuration of payment gateways, such as PayPal, credit cards, and other payment options.
- Taxes: Allows configuration of tax rules, tax classes, and tax rates.
- Catalog: Contains settings related to product management, categories, and attributes.
- Customers: Includes settings related to customer registration, accounts, and address forms.
- Email: Allows configuration of email templates, sending options, and SMTP settings for transactional emails.
Within each section, you’ll find a set of configuration fields that you can modify according to your requirements. After making changes, be sure to click on the “Save Config” button to save your configuration updates.
**Step 1: Create a system configuration layout file**
Create **adminhtml\_system\_config\_edit.xml** in **app/code/Dolphin/Customize/view/adminhtml/layou**t directory with the following code.
```
```
**Step 2: Create css file**
Create **tab.css** in **app/code/Dolphin/Customize/view/adminhtml/web/css** directory with the following code.
```
.admin__page-nav.dws-config-tab._collapsed._show ._collapsible strong:before {
content: "";
background: url(../images/tab/plugin.png) no-repeat scroll 0 0 transparent;
width: 100%;
height: 50px;
display: inline-block;
vertical-align: bottom;
}
.admin__page-nav.dws-config-tab._collapsed._show ._collapsible strong {
font-size: 0;
}
```
- In the above CSS code, in the ***background*** property, we have used the logo image file URL. The **plugin*.png*** is exist inside the ***app/code/Dophin/Customize/view/adminhtml/web/images/tab*** directory.
**Step 3: Create a system configuration file**
Create **system.xml** file inside the **app/code/Dolphin/Customize/etc/adminhtml** directory with the following code.
```
separator-topdolphinDolphin_Statusgridcolor::statusgridcolor_configMagento\Config\Model\Config\Source\YesnoDolphin\Statusgridcolor\Block\Adminhtml\Form\Field\StatusColorsMagento\Config\Model\Config\Backend\Serialized\ArraySerialized
```
- we will add the ***.dws-config-tab*** CSS class in the *class attribute of the tab* tag.
Now execute the below command and go to the system configuration page:
**php bin/magento s:up**
**php bin/magento s:d:c**
**php bin/magento s:s:d -f**
**php bin/magento c:c**
**Result:-**
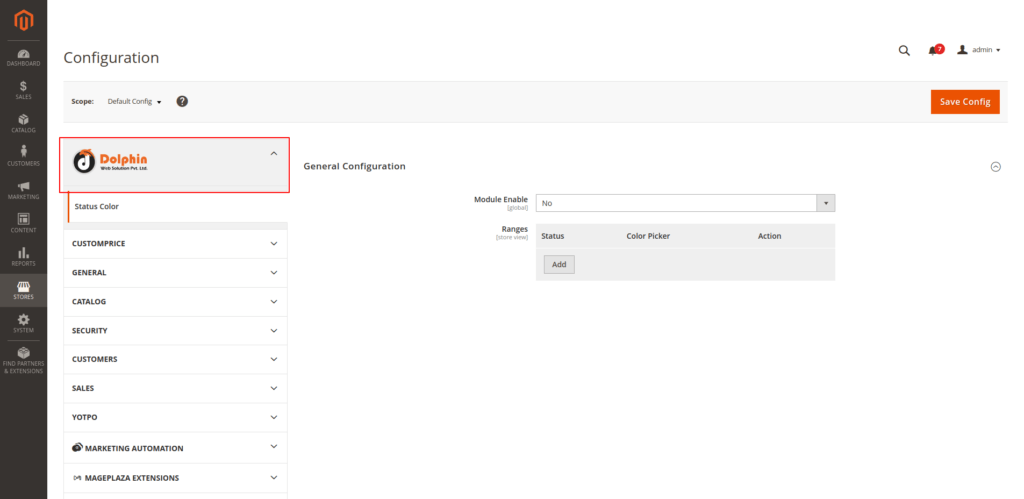
I Hope, This instruction will be helpful for you.
If you have any difficulties regarding this blog, do consider posting them in the Comments section below!
I’m here to help.
**Thank you!**
---
_View the original post at: [https://dolphinwebsolution.com/how-to-set-logo-in-system-configuration-tab-in-magento-2](https://dolphinwebsolution.com/how-to-set-logo-in-system-configuration-tab-in-magento-2)_
_Served as markdown by [Third Audience](https://github.com/third-audience) v3.5.3_
_Generated: 2026-08-26 06:17:52 UTC_