---
title: "How to Perform CRUD Operation with a custom module in Magento 2"
url: "https://dolphinwebsolution.com/how-to-perform-crud-operation-with-a-custom-module-in-magento-2"
date: "2021-04-02T05:22:45+05:30"
modified: "2023-08-29T07:11:28+05:30"
author:
name: "Payal Patel"
categories:
- "Magento"
word_count: 2175
reading_time: "11 min read"
summary: "CRUD Operation in Magento 2 can manage data easily in the database. To create a CRUD, you do not have to enter several line codes. Magento 2 offers functions for easy handling in the database."
description: "CRUD Operation in Magento 2 can manage data easily in the database. To create a CRUD, you do not have to enter several line codes. Magento 2 offers functions..."
keywords: "crud operation,custom module,magento 2,CRUD Operation in Magento 2,crud model,magento 2 crud,magento 2 crud generator,Insert Update Delete in Magento 2, Magento"
language: "en"
schema_type: "Article"
related_posts:
- title: "How to add additional options in magento 2 cart"
url: "https://dolphinwebsolution.com/how-to-add-additional-options-in-cart"
- title: "How to add/remove column and other DB operations to table in Magento 2.3 using declarative schema?"
url: "https://dolphinwebsolution.com/how-to-add-remove-column-and-other-db-operations-to-table-in-magento-2-3-using-declarative-schema"
- title: "How to add tooltip for Payment methods on checkout page"
url: "https://dolphinwebsolution.com/how-to-add-tooltip-for-payment-methods-on-checkout-page"
---
# How to Perform CRUD Operation with a custom module in Magento 2
_Published: April 2, 2021_
_Author: Payal Patel_

> CRUD Operation in Magento 2 can manage data easily in the database. To create a CRUD, you do not have to enter several line codes. Magento 2 offers functions for easy handling in the database.
### CRUD Operation in Magento 2
CRUD Operation in Magento 2 can manage data easily in the database. In the previous tutorial, you learned how to create models, resource models, and collections in Magento 2. Now, we will learn how to perform CRUD operations with a custom module in Magento 2. To create a CRUD operation, you do not have to enter several line codes. Magento 2 offers functions for easy handling in the database. You can also [**hire Magento developer**](https://dolphinwebsolution.com/hire-magento-2-developers/) from Dolphin Web Solution.
We will see below content for CRUD Operation with a custom module.
- Create Database
- Create Module
- Read and Display Data from the Table
- Insert Data
- Update Data
- Delete Data
### **Step 1:** Create Database
We discussed [how to create, drop or other operations using Declarative Schema](https://dolphinwebsolution.com/declarative-schema-in-magento-2-3-x-or-later). So you can see the tutorial and create Declarative Schema. Declarative Schema facilitates the installation and upgrading of code that is contained within a single XML file. We can perform the following operations with DDL(Data Definition Language) and DML(Data Manipulation Language).
### **Step 2:** Create Module
We are already learned [how to create a basic module in Magento 2](https://dolphinwebsolution.com/how-to-create-module-in-magento-2). We need to create **module.xml**, **registration.php**, **routes.xml**, and **Controller** file. You can create **module.xml**, **registration.php**, and **routes.xml** from this tutorial. Now we create controller file **Index.php** in **app/code/Dolphin/MyModule/Controller/Index** with the following code.
```
_resultPageFactory = $resultPageFactory;
parent::__construct($context);
}
public function execute()
{
echo "Module Cretaed Successfully";
}
}
```
Now, run the command for cache clean and run URL **yourdomain/mymodule/index/index** in your browser.
### **Step 3:** Read and Display Data from the Table
Let’s check and follow this tutorial for [how to create Models, Resource Models, and Collections](https://dolphinwebsolution.com/models-resource-models-and-collections-in-magento-2) to manage data in the table.
Now, add the below code in execute method in the controller file.
```
public function execute()
{
return $this->_resultPageFactory->create();
}
```
Create layout file **mymodule\_index\_index.xml** in **app/code/Dolphin/MyModule/view/frontend/layout** folder with the following code.
```
```
Create block file **Index.php** in **app/code/Dolphin/MyModule/Block** folder with the following code.
```
_contactFactory = $contactFactory;
}
public function getData()
{
$contact = $this->_contactFactory->create();
$collection = $contact->getCollection();
return $collection;
}
}
```
Create template file **index.phtml** in **app/code/Dolphin/MyModule/view/frontend/templates** folder with the following code.
```
|
|
|
|
|
|
|
getData();
foreach($collectionData as $collection):
?>
| getName(); ?> |
getEmail(); ?> |
getPhoneNo(); ?> |
getMessage(); ?> |
getCreatedAt(); ?> |
getUpdatedAt(); ?> |
Edit
|
Delete
|
```
Now. run the command for cache clean and run the URL **yourdomain/mymodule/index/index** in your browser.
### **Step 4:** Insert Data
Create controller and action for insert action. We can add the following code to the [**index.phtml**](https://developer.adobe.com/commerce/frontend-core/guide/layouts/xml-instructions/) file in **app/code/Dolphin/MyModule/view/frontend/templates** folder.
```
Add Record
```
Now, create controller file **Insert.php** in **app/code/Dolphin/MyModule/Controller/Index** folder with the following code.
```
_pageFactory = $pageFactory;
return parent::__construct($context);
}
public function execute()
{
return $this->_pageFactory->create();
}
}
```
Create layout file **mymodule\_index\_insert.xml** in **app/code/Dolphin/MyModule/view/frontend/layout** folder with the following code.
```
```
Create block file **Insert.php** in **app/code/Dolphin/MyModule/Block** folder with the following code.
```
_pageFactory = $pageFactory;
return parent::__construct($context);
}
public function execute()
{
return $this->_pageFactory->create();
}
}
```
Create template file **insertData.phtml** in **app/code/Dolphin/MyModule/view/frontend/templates** folder with the following code.
```
```
Now, create a controller for the save action. Create file **Save.php** in **app/code/Dolphin/MyModule/Controller/Index** folder with the following code.
```
_pageFactory = $pageFactory;
$this->_contactFactory = $contactFactory;
return parent::__construct($context);
}
public function execute()
{
if ($this->getRequest()->isPost()) {
$input = $this->getRequest()->getPostValue();
$postData = $this->_contactFactory->create();
if (isset($input['editId'])) {
$id = $input['editId'];
} else {
$id = 0;
}
if($id != 0){
$postData->load($id);
$postData->addData($input);
$postData->setId($id);
$postData->save();
}else{
$postData->setData($input)->save();
}
$this->messageManager->addSuccessMessage("Data added successfully!");
return $this->_redirect('mymodule/index/index');
}
return $this->_redirect('mymodule/index/index');
}
}
```
### **Step 5:** Update Data
Create a controller for the edit action. Create file **Edit.php** in **app/code/Dolphin/MyModule/Controller/Index** folder with the following code.
```
_pageFactory = $pageFactory;
$this->_request = $request;
$this->_coreRegistry = $coreRegistry;
return parent::__construct($context);
}
public function execute()
{
$id = $this->_request->getParam('id');
$this->_coreRegistry->register('editId', $id);
return $this->_pageFactory->create();
}
}
```
Create layout file **mymodule\_index\_edit.xml** in **app/code/Dolphin/MyModule/view/frontend/layout** folder with the following code.
```
```
Create block file **Edit.php** in **app/code/Dolphin/MyModule/Block** folder with the following code.
```
_pageFactory = $pageFactory;
$this->_coreRegistry = $coreRegistry;
$this->_contactLoader = $contactLoader;
return parent::__construct($context,$data);
}
public function execute()
{
return $this->_pageFactory->create();
}
public function getEditData()
{
$id = $this->_coreRegistry->registry('editId');
$postData = $this->_contactLoader->create();
$result = $postData->load($id);
$result = $result->getData();
return $result;
}
}
```
Create template file **editData.phtml** in **app/code/Dolphin/MyModule/view/frontend/templates** folder with the following code.
```
_pageFactory = $pageFactory;
$this->_coreRegistry = $coreRegistry;
$this->_contactLoader = $contactLoader;
return parent::__construct($context,$data);
}
public function execute()
{
return $this->_pageFactory->create();
}
public function getEditData()
{
$id = $this->_coreRegistry->registry('editId');
$postData = $this->_contactLoader->create();
$result = $postData->load($id);
$result = $result->getData();
return $result;
}
}
```
Run the command for cache clean and check the result with URL **yourdomain/mymodule/index/index**.
Add on: [Delete Customer Account for Magento 2](https://dolphinwebsolution.com/shop/delete-customer-account-for-magento.html)
### **Step 6:** Delete Data
Create Controller file for the Delete data. Create **Delete.php** file in **app/code/Dolphin/MyModule/Controller/Index** folder with the following code.
```
_pageFactory = $pageFactory;
$this->_request = $request;
$this->_contactFactory = $contactFactory;
return parent::__construct($context);
}
public function execute()
{
$id = $this->_request->getParam('id');
$postData = $this->_contactFactory->create();
$result = $postData->setId($id);
$result = $result->delete();
return $this->_redirect('mymodule/index/index');
}
}
```
Run the command for cache clean and check the result with URL **yourdomain/mymodule/index/index**.
So after following all the steps your final directory structure would look like below.
[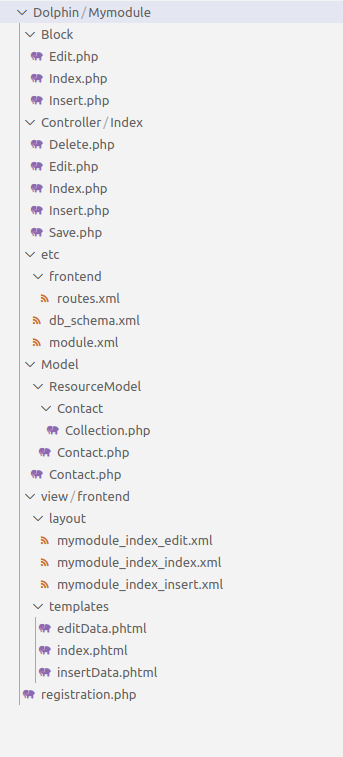](https://dolphinwebsolution.com/wp-content/uploads/2021/04/Screenshot-from-2022-05-24-11-25-36.png)We hope our guide is very effective for you. If any questions, please feel free to leave a comment below. In the next tutorial, you will help with [how to create UI Form and UI Grid in Magento 2](https://dolphinwebsolution.com/how-to-create-ui-form-and-ui-grid-in-magento-2).
---
_View the original post at: [https://dolphinwebsolution.com/how-to-perform-crud-operation-with-a-custom-module-in-magento-2](https://dolphinwebsolution.com/how-to-perform-crud-operation-with-a-custom-module-in-magento-2)_
_Served as markdown by [Third Audience](https://github.com/third-audience) v3.5.3_
_Generated: 2026-08-26 06:55:01 UTC_