---
title: "How to add tooltip for Payment methods on checkout page"
url: "https://dolphinwebsolution.com/how-to-add-tooltip-for-payment-methods-on-checkout-page"
date: "2023-06-26T06:11:57+05:30"
modified: "2023-08-29T06:34:42+05:30"
author:
name: "Jigar Patel"
categories:
- "Magento"
- "Magento2"
word_count: 812
reading_time: "5 min read"
summary: "In Magento 2, tooltips can be added to various elements on the frontend to provide additional information or explanations to users when they hover over those elements. To add a tooltip in Magento 2..."
description: "In Magento 2, tooltips can be added to various elements on the frontend to provide additional information or explanations to users when they hover over those..."
keywords: "tooltip,payment method,checkout, Magento, Magento2"
language: "en"
schema_type: "Article"
related_posts:
- title: "Top 9 Reasons to Choose Magento as Your eCommerce Platform"
url: "https://dolphinwebsolution.com/blog/reasons-choose-magento-ecommerce-platform/"
- title: "How to create Category Page Layout in Magento."
url: "https://dolphinwebsolution.com/how-to-create-category-page-layout-in-magento"
- title: "Magento 2 Add Custom Validation Checkout"
url: "https://dolphinwebsolution.com/magento-2-add-custom-validation-checkout"
---
# How to add tooltip for Payment methods on checkout page
_Published: June 26, 2023_
_Author: Jigar Patel_

In Magento 2, tooltips can be added to various elements on the frontend to provide additional information or explanations to users when they hover over those elements. To add a tooltip in Magento 2, you can follow these steps:
1. Identify the element: Determine the HTML element to which you want to attach the tooltip. It can be an icon, a link, a button, or any other interactive element.
2. Add a tooltip attribute: Add a data attribute named `data-tooltip` to the identified element. For example, `Hover me`. The value of the `data-tooltip` attribute will be the content of the tooltip.
3. Initialize tooltips: Magento 2 uses the Bootstrap framework for its frontend components, including tooltips. To enable tooltips, you need to initialize them using JavaScript. You can do this in your custom JavaScript file or in a script tag within a template file.
- - If using a JavaScript file, create a file (e.g., `custom.js`) in your theme’s directory, such as `app/design/frontend/YourVendor/YourTheme/web/js/custom.js`. Inside the file, add the following code to initialize tooltips:
````
```
require(['jquery', 'bootstrap'], function($) {
$(document).ready(function() {
$('[data-tooltip]').tooltip();
});
});
```
````
- - If using a template file, open the template file (e.g., `.phtml` file) where the element is located, and add the following script tag:
````
```
```
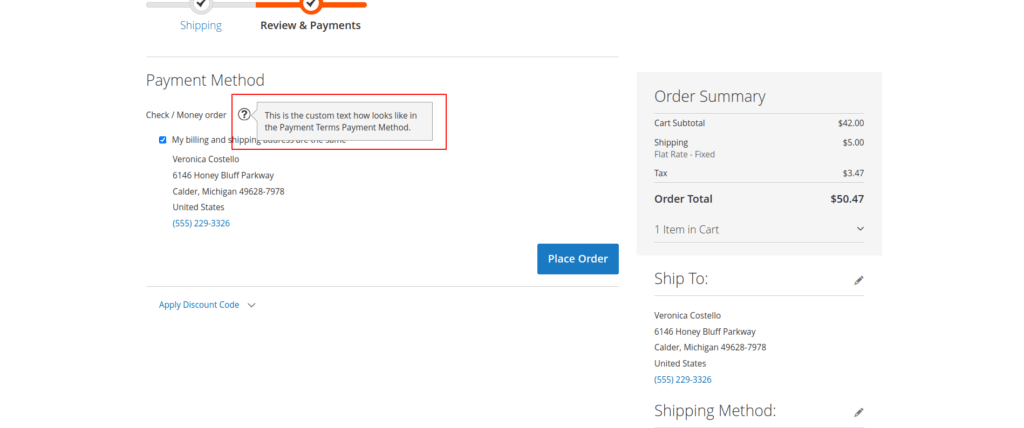
Add a **tooltip** for payment methods on the checkout page in Magento 2, you can follow bellow code on payment HTML file:
```
This is the custom text how looks like in the Payment Terms Payment Method.
```
**Clear cache:** After making changes to your theme or adding a new JavaScript file, remember to clear the Magento cache for the changes to take effect. You can do this by running the following command in the Magento root directory:
**php bin/magento s:up**
**php bin/magento s:d:c**
**php bin/magento s:s:d -f**
**php bin/magento c:c**
**Result:-**
I Hope, This instruction will be helpful for you.
If you have any difficulties regarding this blog, do consider posting them in the Comments section below!
I’m here to help.
**Thank you!**
---
_View the original post at: [https://dolphinwebsolution.com/how-to-add-tooltip-for-payment-methods-on-checkout-page](https://dolphinwebsolution.com/how-to-add-tooltip-for-payment-methods-on-checkout-page)_
_Served as markdown by [Third Audience](https://github.com/third-audience) v3.5.3_
_Generated: 2026-08-26 06:54:26 UTC_