How To Add Split Button on Admin Page in Magento 2

How to Add Split Button on Admin Sales Invoice View Page In Magento 2. A split button is a UI component. Buttons are calls to action, and their labels should be limited to three words (four words maximum, if including a short verb or word).
Buttons can be used for:
- Calls to action for task flows: to begin, continue, or submit a task
- Navigation in featured modules of content, like banners and content teasers
Button types are primary, secondary, and tertiary. Each page should have a maximum limit of one primary button. Split buttons include multiple actions. Button counts in a Button Bar or any array of buttons should be limited to four buttons, maximum then the user can select the displayed option or any other option from the drop-down list. The drop-down list shows the options that are very rarely used.
Sometimes, the Magento 2 store has a need to add a split button in the admin sales invoice view page without changing core Magento functionalities.
Read this: How to Add Custom Button to Admin Sales Invoice View in Magento 2.
Steps to Add Split Button on Admin Sales Invoice View Page in Magento 2
We are already learned how to create a basic module in Magento 2. We need to create module.xml and registration.php files. You can create module.xml and registration.php from this tutorial.
Step 1: Create Dependency injection (di.xml)
Now we create Dependency injection file di.xml in app/code/Dolphin/InvoiceEmail/etc/adminhtml folder with the following code.
<?xml version="1.0" ?>
<config xmlns:xsi="http://www.w3.org/2001/XMLSchema-instance" xsi:noNamespaceSchemaLocation="urn:magento:framework:ObjectManager/etc/config.xsd">
    <type name="Magento\Sales\Block\Adminhtml\Order\Invoice\View">
        <plugin name="Dolphin_InvoiceEmail_Order_View" type="Dolphin\InvoiceEmail\Plugin\Adminhtml\Order\Invoice\View" sortOrder="10" disabled="false"/>
    </type>
</config>
Step 2: Create plugin class
Finally, add in the Plugin class. As with the default sales invoice view plugin, a beforeSetLayout() method is defined, and the invoice view is added as part of the \Magento\Sales\Block\Adminhtml\Order\Invoice\View.
Create plugin class file View.php in app/code/Dolphin/InvoiceEmail/Plugin/Adminhtml/Order/Invoice folder with the following code.
<?php
namespace Dolphin\InvoiceEmail\Plugin\Adminhtml\Order\Invoice;

use Magento\Backend\Model\UrlInterface;
use Magento\Framework\ObjectManagerInterface;

class View
{
    protected $object_manager;
    protected $_backendUrl;

    public function __construct(
        \Magento\Backend\Block\Widget\Context $context,
        ObjectManagerInterface $om,
        UrlInterface $backendUrl,
        array $data = []
    ) {
        $this->object_manager = $om;
        $this->_backendUrl = $backendUrl;
    }

    public function beforeSetLayout(\Magento\Sales\Block\Adminhtml\Order\Invoice\View $view)
    {
        if ($view->getInvoice()->getId()) {
            $addButtonProps = [
                'id' => 'test',
                'label' => __('Split Button'),
                'class' => 'add',
                'button_class' => '',
                'class_name' => 'Magento\Backend\Block\Widget\Button\SplitButton',
                'options' => $this->getCustomActionListOptions(),
            ];

            $view->addButton('test',$addButtonProps);
            $view->removeButton('send_notification');
        }

    }
    protected function getCustomActionListOptions()
    {
        $url = $this->_backendUrl->getUrl('');
        $splitButtonOptions=[
            'button_1'=>['label'=>__('Button 1'),'onclick'=>'setLocation(\'' . $url . '\')'],
            'button_2'=>['label'=>__('Button 2'),'onclick'=>'setLocation(\'' . $url . '\')'],
            'button_3'=>['label'=>__('Button 3'),'onclick'=>'setLocation(\'' . $url . '\')']
        ];
        return $splitButtonOptions;
    }

}
$view->addButton: Selector for the element used for item adding.
$view->removeButton: Selector for the element used for item removing.
Now execute below command and referesh the page:
[dt_highlight color="" text_color="" bg_color=""]php bin/magento s:up[/dt_highlight]
[dt_highlight color="" text_color="" bg_color=""]php bin/magento s:s:d -f[/dt_highlight]
[dt_highlight color="" text_color="" bg_color=""]php bin/magento c:c[/dt_highlight]
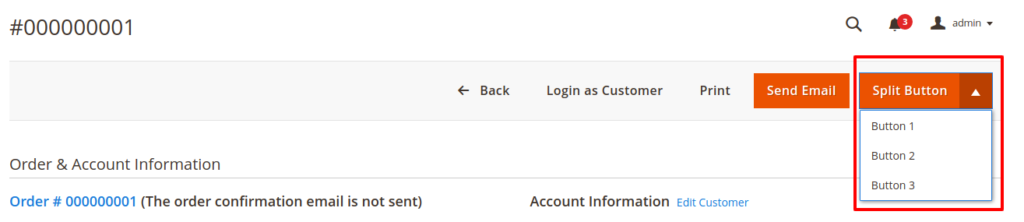
Result:
I Hope, This instruction will be helpful for you.
If you have any difficulties regarding this blog, do consider them posting in the Comments section below!
I’m here to help.
Thank you!

We can help you with
- Dedicated Team
- Setup Extended Team
- Product Development
- Custom App Development
Our Offices

AHMEDABAD (INDIA)
B-203, B-204, Empire Business Hub, Science City Road, Sola, Ahmedabad – 380060

BERLIN (GERMANY)
Badensche Str. 28, 10715 Berlin, Germany

CALIFORNIA (USA)
9601 Reseda Blvd, Apt#223, Northridge CA-91324, USA

ALBERTA (CANADA)
302 Skyview Ranch Drive NE, Calgary, Alberta, Canada T3N0P5


