---
title: "How to Add Customer Attribute Programmatically in Magento 2"
url: "https://dolphinwebsolution.com/how-to-add-customer-attribute-in-magento-2"
date: "2021-10-13T06:04:39+05:30"
modified: "2023-08-25T09:19:36+05:30"
author:
name: "Jigar Patel"
categories:
- "Magento"
word_count: 1046
reading_time: "6 min read"
summary: "How to add customer attributes in Magento 2 programmatically and that attribute display in a grid.
Magento 2 Custom Customer Attribute is useful when you want to add a custom field in customer a..."
description: "How to add customer attributes in Magento 2 programmatically and that attribute display in a grid. Magento 2 Custom Customer Attribute is useful when you wan..."
keywords: "Add Customer Attribute,Add Customer Attribute in magento 2,magento add customer attribute programmatically,magento 2 add customer attribute,add customer attribute magento 2,add customer attribute programmatically,add customer attribute programmatically in magento 2, Magento"
language: "en"
schema_type: "Article"
related_posts:
- title: "Shopware Vs Magento – Which Is The Right Platform For You"
url: "https://dolphinwebsolution.com/blog/shopware-vs-magento/"
- title: "How To Add Date Picker In System Configuration Magento 2"
url: "https://dolphinwebsolution.com/how-to-add-date-picker-in-system-configuration-magento-2"
- title: "How Much Does Magento Development Cost in 2026?"
url: "https://dolphinwebsolution.com/blog/magento-development-cost/"
---
# How to Add Customer Attribute Programmatically in Magento 2
_Published: October 13, 2021_
_Author: Jigar Patel_

**How to add customer attributes in Magento 2 programmatically and that attribute display in a grid**.
Magento 2 Custom Customer Attribute is useful when you want to add a custom field in customer address form and customer account page. After that, You can also get custom attribute value in customer objects.
Creating customer custom attributes supports you in smartly understanding the customer. Some examples of custom customer attributes are visitors’ mobile numbers, interests/hobbies, etc. Depending on your requirement, you may need to add more fields.
Introduce several ways to add an extra tab to order view, Taken **Dolphin** as Package name and **PhoneNumber** as Modulename for simplicity. code snippets are under a module named **Dolphin\_PhoneNumber**.
Before creating the customer attribute, we need to create a new module We already have a blog on “[how to create a basic module in Magento 2](https://dolphinwebsolution.com/how-to-create-module-in-magento-2)“. We need to create **module.xml** and **registration.php** file. You can create **module.xml** and **registration.php** from this tutorial.
You also Like To use This: [Customer Attributes Extension for Magento 2](https://dolphinwebsolution.com/shop/customer-attributes-for-magento.html)
#### Create Class (DataPatch File)
Magento introduces a new way to modify data in Magento 2 database: **Data / Schema Patches** (**[Magento Documentation](https://developer.adobe.com/commerce/php/development/components/declarative-schema/patches/)**). Implement a data patch to add a customer’s attribute to the database.
Create an **“AddCustomerPhoneNumber.php”** file in the **app/code/Dolphin/PhoneNumber/Setup/Patch/Data** folder with the following code.
```
moduleDataSetup = $moduleDataSetup;
$this->customerSetupFactory = $customerSetupFactory;
$this->attributeSetFactory = $attributeSetFactory;
}
/**
* {@inheritdoc}
*/
public function apply()
{
$this->moduleDataSetup->getConnection()->startSetup();
/** @var CustomerSetup $customerSetup */
$customerSetup = $this->customerSetupFactory->create(['setup' => $this->moduleDataSetup]);
$customerEntity = $customerSetup->getEavConfig()->getEntityType(Customer::ENTITY);
$attributeSetId = $customerEntity->getDefaultAttributeSetId();
/** @var $attributeSet Set */
$attributeSet = $this->attributeSetFactory->create();
$attributeGroupId = $attributeSet->getDefaultGroupId($attributeSetId);
$customerSetup->addAttribute(
Customer::ENTITY,
'phone_number',
[
'label' => 'Phone Number',
'input' => 'text',
'type' => 'varchar',
'source' => '',
'required' => false,
'position' => 333,
'visible' => true,
'system' => false,
'is_used_in_grid' => true,
'is_visible_in_grid' => true,
'is_filterable_in_grid' => true,
'is_searchable_in_grid' => false,
'backend' => ''
]
);
$attribute = $customerSetup->getEavConfig()->getAttribute(Customer::ENTITY, 'phone_number');
$attribute->addData([
'used_in_forms' => [
'adminhtml_customer',
'customer_account_create',
'customer_account_edit'
]
]);
$attribute->addData([
'attribute_set_id' => $attributeSetId,
'attribute_group_id' => $attributeGroupId
]);
$attribute->save();
$this->moduleDataSetup->getConnection()->endSetup();
}
public function revert()
{
$this->moduleDataSetup->getConnection()->startSetup();
/** @var CustomerSetup $customerSetup */
$customerSetup = $this->customerSetupFactory->create(['setup' => $this->moduleDataSetup]);
$customerSetup->removeAttribute(\Magento\Customer\Model\Customer::ENTITY, 'phone_number');
$this->moduleDataSetup->getConnection()->endSetup();
}
/**
* {@inheritdoc}
*/
public function getAliases()
{
return [];
}
/**
* {@inheritdoc}
*/
public static function getDependencies()
{
return [
];
}
}
```
**After , run below command to install the module:**
- \[dt\_highlight color=”” text\_color=”” bg\_color=””\]php bin/magento s:up\[/dt\_highlight\]
- \[dt\_highlight color=”” text\_color=”” bg\_color=””\]php bin/magento s:s:d -f\[/dt\_highlight\]
- \[dt\_highlight color=”” text\_color=”” bg\_color=””\]php bin/magento c:c\[/dt\_highlight\]
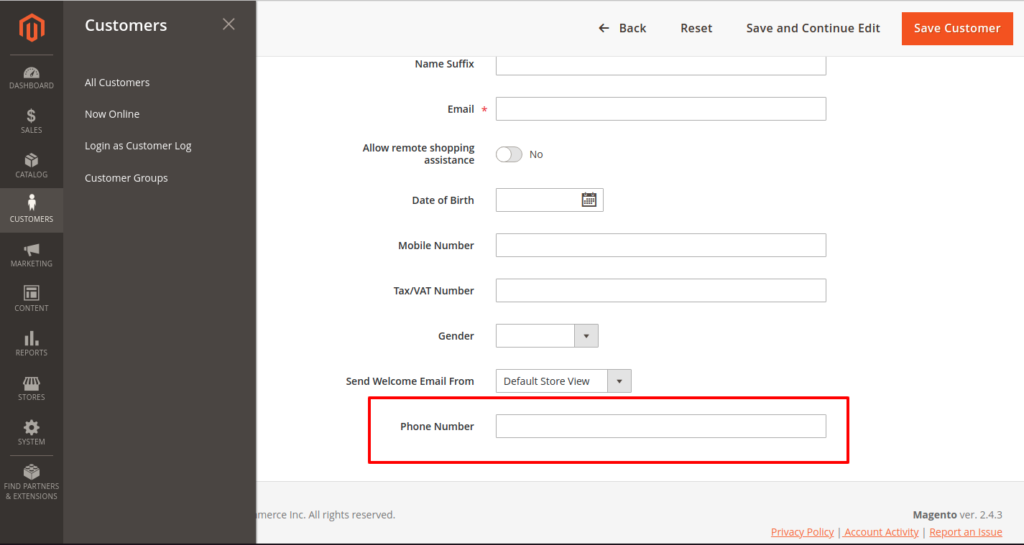
**Result:**
Read this: [Create Sales Order Programmatically in Magento 2](https://dolphinwebsolution.com/create-sales-order-programmatically-in-magento-2)
**Now Add This Attribute in Admin Grid in Magento 2**
#### Step:1 Create Listing UI Component
Create a **“customer\_listing.xml”** file in the **app/code/Dolphin/PhoneNumber/view/adminhtml/ui\_component** folder with the following code.
```
-
- text
- text
- Phone Number
- 40
```
#### Step:2 Create Class
Create a **“PhoneNumber.php”** file in the **app/code/Dolphin/PhoneNumber/Ui/Component/Listing/Column** folder with the following code.
```
create('Magento\Customer\Model\Customer')->load($item['entity_id']);
$item[$this->getData('name')] = $customer->getPhoneNumber();
}
}
return $dataSource;
}
}
?>
```
**Step:3 Create extension\_attributes**
Create a **“extension\_attributes.xml”** file in the **app/code/Dolphin/PhoneNumber/etc** folder with the following code.
```
```
- **extension attributes:** Check the interface for the methods `getExtensionAttributes()` and `setExtensionAttributes()` to determine if they are available for the entity
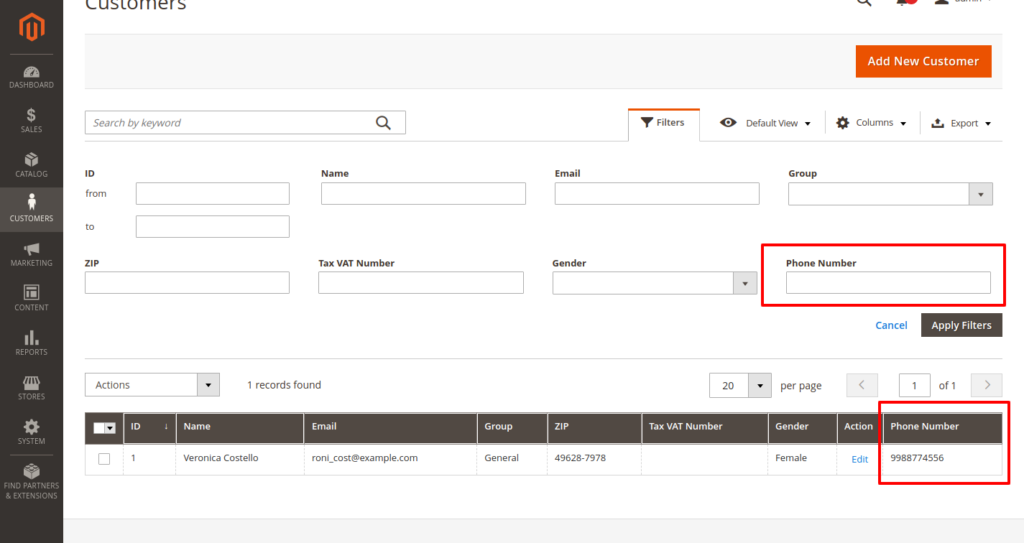
**Result:**
I Hope, This instruction will be helpful for you.
If you have any difficulties regarding this blog, do consider them posting in the Comments section below!
I’m here to help.
**Thank you!**
---
_View the original post at: [https://dolphinwebsolution.com/how-to-add-customer-attribute-in-magento-2](https://dolphinwebsolution.com/how-to-add-customer-attribute-in-magento-2)_
_Served as markdown by [Third Audience](https://github.com/third-audience) v3.5.3_
_Generated: 2026-08-26 06:54:09 UTC_