---
title: "How to Add Custom Product Image Role in Magento 2"
url: "https://dolphinwebsolution.com/how-to-add-custom-product-image-role-in-magento-2"
date: "2021-07-05T13:56:30+05:30"
modified: "2023-08-31T05:03:16+05:30"
author:
name: "Mahesh Makwana"
categories:
- "Magento"
word_count: 1333
reading_time: "7 min read"
summary: "We learn how to add custom product image role into products from Magento 2. Media gallery image roles are mostly used by many users which define different roles to different images which help users..."
description: "We learn how to add custom product image role into products from Magento 2. Media gallery image roles are mostly used by many users which define different ro..."
keywords: "custom product image, Magento"
language: "en"
schema_type: "Article"
related_posts:
- title: "How to include & add custom js in Magento 2"
url: "https://dolphinwebsolution.com/how-to-include-add-custom-js-in-magento-2"
- title: "How to use event only in Web API Rest and Web API Soap?"
url: "https://dolphinwebsolution.com/how-to-use-event-only-in-web-api-rest-and-web-api-soap"
- title: "How to Set Custom Validation Message in Magento 2"
url: "https://dolphinwebsolution.com/set-custom-validation-message-in-magento-2"
---
# How to Add Custom Product Image Role in Magento 2
_Published: July 5, 2021_
_Author: Mahesh Makwana_

We learn how to add custom product image role into products from Magento 2. Media gallery image roles are mostly used by many users which define different roles to different images which help users to use images according to their requirements. **Magento 2 allows creating custom image roles via admin and programmatically.**
let’s start with one example, We add two image roles. One for page banner image and second for page left image which is only shown in the page header, not in product media gallery. Our custom images are shown in the product page header section. We have [**Magento 2 certified developers** ](https://dolphinwebsolution.com/hire-magento-2-developers/)so If you need you can hire.
#### Our custom product image Role Names
1)Top Banner
2)Top Banner Left
First We create a basic module if you don’t know then [click here.](https://dolphinwebsolution.com/how-to-create-module-in-magento-2)
**Step-1:** Create **registration.php** at **app/code/Dolphin/CustomImageRole**
```
```
**Step-3:** Now we create custom image role attributes. Create **InstallData.php** at **app/code/Dolphin/CustomImageRole/Setup**
```
eavSetupFactory = $eavSetupFactory;
}
public function install(ModuleDataSetupInterface $setup, ModuleContextInterface $context)
{
$eavSetup = $this->eavSetupFactory->create(['setup' => $setup]);
/* Image Type Banner Top */
$eavSetup->removeAttribute(\Magento\Catalog\Model\Product::ENTITY, 'top_banner_image');
$eavSetup->addAttribute(
\Magento\Catalog\Model\Product::ENTITY,
'top_banner_image',
[
'type' => 'varchar',
'label' => 'Top Banner',
'input' => 'media_image',
'frontend' => 'Magento\Catalog\Model\Product\Attribute\Frontend\Image',
'global' => \Magento\Eav\Model\Entity\Attribute\ScopedAttributeInterface::SCOPE_STORE,
'filterable' => false,
'visible_on_front' => false,
'used_in_product_listing' => false,
'sort_order' => 100,
'required' => false,
]
);
/* Image Type Banner Top Left */
$eavSetup->removeAttribute(\Magento\Catalog\Model\Product::ENTITY, 'top_banner_left_image');
$eavSetup->addAttribute(
\Magento\Catalog\Model\Product::ENTITY,
'top_banner_left_image',
[
'type' => 'varchar',
'label' => 'Top Banner Left',
'input' => 'media_image',
'frontend' => 'Magento\Catalog\Model\Product\Attribute\Frontend\Image',
'global' => \Magento\Eav\Model\Entity\Attribute\ScopedAttributeInterface::SCOPE_STORE,
'filterable' => false,
'visible_on_front' => false,
'used_in_product_listing' => false,
'sort_order' => 110,
'required' => false,
]
);
}
}
```
**After creating and adding above file run Magento 2 commands**
```
php bin/magento setup:upgrade
php bin/magento setup:static-content:deploy -f
php bin/magento cache:clean
```
You can see our custom image roles in **Product Form** in **Images And Videos** section.
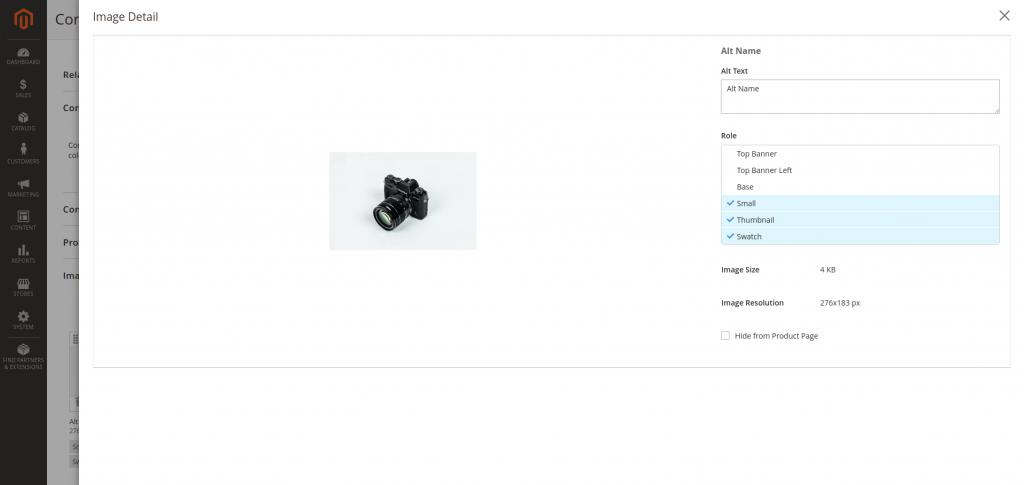
Now you can assign your custom role to image, And also image show on frontend product details page. **Now we remove custom assign images from product details page image gallery.**
**Step-4:** Create **di.xml** at **app/code/Dolphin/CustomImageRole/etc**
```
```
**Step-5:** Create **RemoveImagesToGalleryBlock.php** at **app/code/Dolphin/CustomImageRole/Plugin/Catalog/Model/Product**
```
_filesystem = $filesystem;
$this->_collectionFactory = $collectionFactory;
}
public function afterGetMediaGalleryImages(Product $subject, $result)
{
$directory = $this->_filesystem->getDirectoryRead(DirectoryList::MEDIA);
if ($subject->hasData('media_gallery_images')) {
$subject->setData('media_gallery_images', $this->_collectionFactory->create());
if (!$subject->getData('media_gallery_images')->count() && is_array($subject->getMediaGallery('images'))) {
$images = $subject->getData('media_gallery_images');
foreach ($subject->getMediaGallery('images') as $image) {
if (!empty($image['disabled'])
|| !empty($image['removed'])
|| empty($image['value_id'])
|| $images->getItemById($image['value_id']) != null
) {
continue;
}
// check top banner left image
if ($image['file'] == $subject->getTopBannerLeftImage()) {
continue;
}
// check top banner image
if ($image['file'] == $subject->getTopBannerImage()) {
continue;
}
$image['url'] = $subject->getMediaConfig()->getMediaUrl($image['file']);
$image['id'] = $image['value_id'];
$image['path'] = $directory->getAbsolutePath($subject->getMediaConfig()->getMediaPath($image['file']));
$images->addItem(new \Magento\Framework\DataObject($image));
}
$subject->setData('media_gallery_images', $images);
}
}
return $subject->getData('media_gallery_images');
}
}
```
**After creating above files please run PHP bin/Magento cache: clean command. Now you can check-in product details page our custom image role assign image are not showing in product media gallery.**
Now we show our custom assign roles images to [product page header](https://experienceleague.adobe.com/docs/commerce-admin/content-design/design/layout/page-layout.html) section.
**Step-6:** Create **catalog\_product\_view.xml** at **app/code/Dolphin/CustomImageRole/view/frontend/layout**
```
```
**Step-7:** Create **product-topimage.phtml** at **app/code/Dolphin/CustomImageRole/view/frontend/templates/product/view**
```
helper(Dolphin\CustomImageRole\Helper\Data::class);
$productData = $customizeHelper->getCurrentProduct();
$allowed = array('gif', 'png', 'jpg', 'jpeg');
if ($productData) {
/* Top Banner Image */
if ($productData->getTopBannerImage()) {
$filename = $productData->getTopBannerImage();
$ext = pathinfo($filename, PATHINFO_EXTENSION);
if (in_array($ext, $allowed)) {
$topUrl = $customizeHelper->getTopBannerImageUrl($productData->getTopBannerImage());
?>
escapeUrl($topUrl) ?>') no-repeat center;"
alt="escapeHtmlAttr($productData->getTopBannerImage()) ?>"> getTopBannerLeftImage()) {
$filename = $productData->getTopBannerLeftImage();
$ext = pathinfo($filename, PATHINFO_EXTENSION);
if (in_array($ext, $allowed)) {
$topLeftUrl = $customizeHelper->getTopBannerImageUrl($productData->getTopBannerLeftImage());
?>
 ?>) ```
**Step-8:** Create **Data.php** at **app/code/Dolphin/CustomImageRole/Helper**
```
registry = $registry;
$this->storeManager = $storeManager;
}
public function getCurrentProduct()
{
return $this->registry->registry('current_product');
}
public function getTopBannerImageUrl($imageName)
{
$store = $this->storeManager->getStore();
return $store->getBaseUrl(\Magento\Framework\UrlInterface::URL_TYPE_MEDIA) . 'catalog/product' . $imageName;
}
}
```
After adding the above files please run [Magento upgrade](https://dolphinwebsolution.com/how-to-create-install-upgrade-uninstall-script-in-magento-2) and cache commands. You can show custom assign roles images are at top of the product details page. You can only see images if you assign images to our custom role.
I hope this helps you. For any doubts regarding this topic, please write your doubts in the comments section.
---
_View the original post at: [https://dolphinwebsolution.com/how-to-add-custom-product-image-role-in-magento-2](https://dolphinwebsolution.com/how-to-add-custom-product-image-role-in-magento-2)_
_Served as markdown by [Third Audience](https://github.com/third-audience) v3.5.3_
_Generated: 2026-08-26 06:55:12 UTC_
```
**Step-8:** Create **Data.php** at **app/code/Dolphin/CustomImageRole/Helper**
```
registry = $registry;
$this->storeManager = $storeManager;
}
public function getCurrentProduct()
{
return $this->registry->registry('current_product');
}
public function getTopBannerImageUrl($imageName)
{
$store = $this->storeManager->getStore();
return $store->getBaseUrl(\Magento\Framework\UrlInterface::URL_TYPE_MEDIA) . 'catalog/product' . $imageName;
}
}
```
After adding the above files please run [Magento upgrade](https://dolphinwebsolution.com/how-to-create-install-upgrade-uninstall-script-in-magento-2) and cache commands. You can show custom assign roles images are at top of the product details page. You can only see images if you assign images to our custom role.
I hope this helps you. For any doubts regarding this topic, please write your doubts in the comments section.
---
_View the original post at: [https://dolphinwebsolution.com/how-to-add-custom-product-image-role-in-magento-2](https://dolphinwebsolution.com/how-to-add-custom-product-image-role-in-magento-2)_
_Served as markdown by [Third Audience](https://github.com/third-audience) v3.5.3_
_Generated: 2026-08-26 06:55:12 UTC_