How To Add Custom Attribute Data To Recently Viewed Products Widget


 we all will get to know what is Widget in Magento 2.
Widgets provide powerful functionalities that are used to add dynamic or static content to store pages or blocks. You can add widgets in any CMS block of Magento 2 to display such content or elements, for example:
- Dynamic product data
- Dynamic lists of the recently viewed products
- Promotional banners
- Interactive navigation elements and action blocks
- Dynamic flash elements that are inserted in content pages
In the recently viewed products widget settings there are only name, price, image, and learn_more available.
For the product attribute name i’ve spotted the file
vendor/magento/module-catalog/view/frontend/ui_component/widget_recently_viewed.xml:
<column name="name" component="Magento_Catalog/js/product/name" sortOrder="1" displayArea="details-area">
    <settings>
        <label translate="true">Name</label>
        <bodyTmpl>Magento_Catalog/product/name</bodyTmpl>
    </settings>
</column>
vendor/magento/module-catalog/view/base/web/template/product/name.html:
<strong if="isAllowed()"
        class="product-item-name">
    <a attr="href: $row().url" html="$col.getLabel($row())"/>
</strong>
Steps To Add Custom Attribute Data To Recently Viewed Products Widget
We are already learned how to create a basic module in Magento 2. We need to create module.xml and registration.php files. You can create module.xml and registration.php from this tutorial.
Here we are using Dolphin as Vendor name and Recently as the name of the module. You can change this according to your Vendor and Module name.
we have a custom product attribute color and we are going to include this attribute to be loaded in the recently viewed widget list view.
Step 1: Create widget file
Create a widget file widget.xml in app/code/Dolphin/Recently/etc folder with the following code.
<?xml version="1.0" encoding="UTF-8"?>
<widgets xmlns:xsi="http://www.w3.org/2001/XMLSchema-instance"
         xsi:noNamespaceSchemaLocation="urn:magento:module:Magento_Widget:etc/widget.xsd">
    <widget id="catalog_recently_viewed">
        <parameters>
            <parameter name="show_attributes" xsi:type="multiselect" required="true" visible="true">
                <options>
                    <option name="color" value="color">
                        <label translate="true">Color</label>
                    </option>
                </options>
            </parameter>
        </parameters>
    </widget>
</widgets>
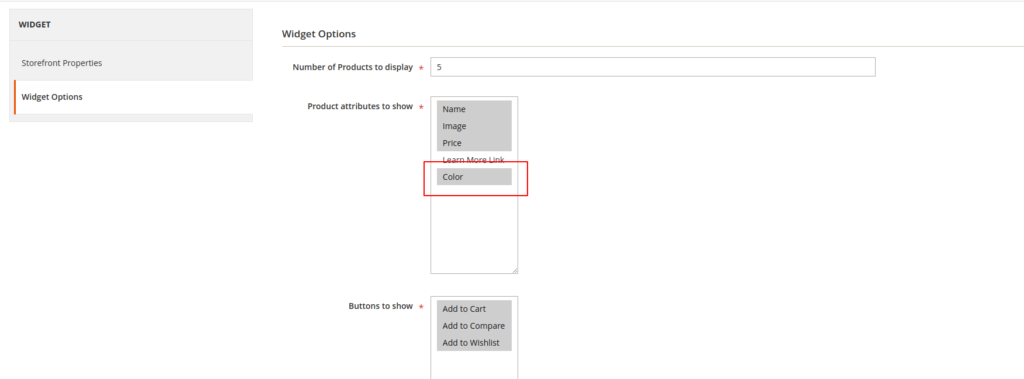
Once apply the above code you will be able to choose the option in Widgets->Choose Widget->Widget Options->Product attributes to show

Step 2: Create Dependency injection
Create dependency injection file di.xml in the app/code/Dolphin/Recently/etc folder with the following code.
<?xml version="1.0"?>
<config xmlns:xsi="http://www.w3.org/2001/XMLSchema-instance" xsi:noNamespaceSchemaLocation="urn:magento:framework:ObjectManager/etc/config.xsd">
    <type name="Magento\Catalog\Ui\DataProvider\Product\ProductRenderCollectorComposite">
        <arguments>
            <argument name="productProviders" xsi:type="array">
                <item name="color" xsi:type="object">\Dolphin\Recently\Ui\DataProvider\Product\Listing\Collector\Color</item>
            </argument>
        </arguments>
    </type>
</config>
Step 3: Create an Extention Attribute
Create Extention Attribute file extension_attributes.xml in the app/code/Dolphin/Recently/etc folder with the following code.
<?xml version="1.0"?>
<config xmlns:xsi="http://www.w3.org/2001/XMLSchema-instance" xsi:noNamespaceSchemaLocation="urn:magento:framework:Api/etc/extension_attributes.xsd">
    <extension_attributes for="Magento\Catalog\Api\Data\ProductRenderInterface">
        <attribute code="color" type="string"/>
    </extension_attributes>
</config>
Step 4: Create a class file for DataProvider
Create Class file Color.php in the app/code/Dolphin/Recently/Ui/DataProvider/Product/Listing/Collector folder with the following code.
<?php

namespace Dolphin\Recently\Ui\DataProvider\Product\Listing\Collector;

use Magento\Catalog\Api\Data\ProductInterface;
use Magento\Catalog\Api\Data\ProductRenderExtensionFactory;
use Magento\Catalog\Api\Data\ProductRenderInterface;
use Magento\Catalog\Ui\DataProvider\Product\ProductRenderCollectorInterface;

/**
 * Class Color
 * @package Dolphin\Recently\Ui\DataProvider\Product\Listing\Collector
 */
class Color implements ProductRenderCollectorInterface
{
    const KEY = "color";

    /**
     * @var ProductRenderExtensionFactory
     */
    private $productRenderExtensionFactory;

    /**
     * color constructor.
     * @param ProductRenderExtensionFactory $productRenderExtensionFactory
     */
    public function __construct(
        ProductRenderExtensionFactory $productRenderExtensionFactory,
        \Magento\Catalog\Model\ProductFactory $productFactory
    ) {

        $this->productRenderExtensionFactory = $productRenderExtensionFactory;
        $this->productFactory = $productFactory;
    }

    /**
     * @param ProductInterface $product
     * @param ProductRenderInterface $productRender
     */
    public function collect(ProductInterface $product, ProductRenderInterface $productRender)
    {
        $extensionAttributes = $productRender->getExtensionAttributes();

        if (!$extensionAttributes) {
            $extensionAttributes = $this->productRenderExtensionFactory->create();
        }

        if($color = $product->getColor()) {
            $colorValue= $this->getOptionLabelByValue('color',$color);
            $extensionAttributes->setColor($colorValue);
        }

        $productRender->setExtensionAttributes($extensionAttributes);
    }

    public function getOptionLabelByValue($attributeCode,$optionId)
    {
        $product = $this->productFactory->create();
        $isAttributeExist = $product->getResource()->getAttribute($attributeCode);
        $optionText = '';
        if ($isAttributeExist && $isAttributeExist->usesSource()) {
            $optionText = $isAttributeExist->getSource()->getOptionText($optionId);
        }
        return $optionText;
    }
}
Step 5: Create widget definition
Create widget definition widget_recently_viewed.xml in the app/code/Dolphin/Recently/view/frontend/ui_component folder with the following code.include our attribute as a column in the widget definition.
<?xml version="1.0" encoding="UTF-8"?>
<listing xmlns:xsi="http://www.w3.org/2001/XMLSchema-instance" xsi:noNamespaceSchemaLocation="urn:magento:module:Magento_Ui:etc/ui_configuration.xsd">
    <columns name="widget_columns">
        <column name="color" component="Dolphin_Recently/js/product/color" displayArea="description-area">
            <settings>
                <label translate="true">color</label>
                <bodyTmpl>Dolphin_Recently/product/color</bodyTmpl>
            </settings>
        </column>
    </columns>
</listing>
Step 6: Create a js file
Create js file color.js in the app/code/Dolphin/Recently/view/frontend/web/js/product folder with the following code.
define([
    'Magento_Ui/js/grid/columns/column',
    'Magento_Catalog/js/product/list/column-status-validator'
], function (Column, columnStatusValidator) {
    'use strict';

    return Column.extend({

        /**
         * @param row
         * @returns {boolean}
         */
        hasValue: function (row) {
            return "color" in row['extension_attributes'];
        },

        /**
         * @param row
         * @returns {*}
         */
        getValue: function (row) {
            console.log(row['extension_attributes']['color']);
            return row['extension_attributes']['color'];
        },

        /**
         * @param row
         * @returns {*|boolean}
         */
        isAllowed: function (row) {
            console.log(columnStatusValidator.isValid(this.source(), 'color', 'show_attributes') && this.hasValue(row) );
            return (columnStatusValidator.isValid(this.source(), 'color', 'show_attributes') && this.hasValue(row) );
        }

    });
});
Step 7: Create Html template file
Create html template file color.html in the app/code/Dolphin/Recently/view/frontend/web/template/product folder with the following code.
<strong if="isAllowed($row())" class="product product-item-color color">
    <span class="label" text="label"></span>
    <span class="value" text="getValue($row())"></span>
</strong>
Now execute the below command and go to the system configuration page:
[dt_highlight color=”” text_color=”” bg_color=””]php bin/magento setup:upgrade[/dt_highlight]
[dt_highlight color=”” text_color=”” bg_color=””]php bin/magento setup:static-content:deploy -f[/dt_highlight]
[dt_highlight color=”” text_color=”” bg_color=””]php bin/magento cache:flush[/dt_highlight]
Result:
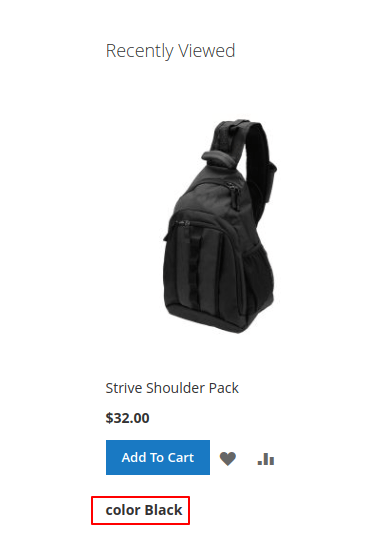
I Hope, This instruction will be helpful for you.
Happy Coding with magento2!! 🙂
If you have any difficulties regarding this blog, do consider them posting in the Comments section below!
I’m here to help.
Thank you!

We can help you with
- Dedicated Team
- Setup Extended Team
- Product Development
- Custom App Development
Our Offices

AHMEDABAD (INDIA)
B-203, B-204, Empire Business Hub, Science City Road, Sola, Ahmedabad – 380060

BERLIN (GERMANY)
Badensche Str. 28, 10715 Berlin, Germany

CALIFORNIA (USA)
9601 Reseda Blvd, Apt#223, Northridge CA-91324, USA

ALBERTA (CANADA)
302 Skyview Ranch Drive NE, Calgary, Alberta, Canada T3N0P5


