---
title: "How To Add Custom Attribute Data To Recently Viewed Products Widget"
url: "https://dolphinwebsolution.com/how-to-add-custom-attribute-data-to-recently-viewed-products-widget"
date: "2022-10-15T05:23:31+05:30"
modified: "2023-08-24T09:53:20+05:30"
author:
name: "Jigar Patel"
categories:
- "Magento"
word_count: 1156
reading_time: "6 min read"
summary: "we all will get to know what is Widget in Magento 2.
Widgets provide powerful functionalities that are used to add dynamic or static content to store pages or blocks. You can add widgets in any ..."
description: "we all will get to know what is Widget in Magento 2. Widgets provide powerful functionalities that are used to add dynamic or static content to store pages o..."
keywords: "widget,custom attribute,recently viewed products,color, Magento"
language: "en"
schema_type: "Article"
related_posts:
- title: "Magento 2 Get Product Salable Quantity Programmatically"
url: "https://dolphinwebsolution.com/magento-2-get-product-salable-quantity-programmatically"
- title: "Magento 2.3.XX unable to serialize value and Failed to load the components errors on checkout"
url: "https://dolphinwebsolution.com/magento-2-3-xx-unable-to-serialize-value"
- title: "How to Customize Product Page Layout in Magento 2"
url: "https://dolphinwebsolution.com/how-to-customize-product-page-layout-in-magento-2"
---
# How To Add Custom Attribute Data To Recently Viewed Products Widget
_Published: October 15, 2022_
_Author: Jigar Patel_

[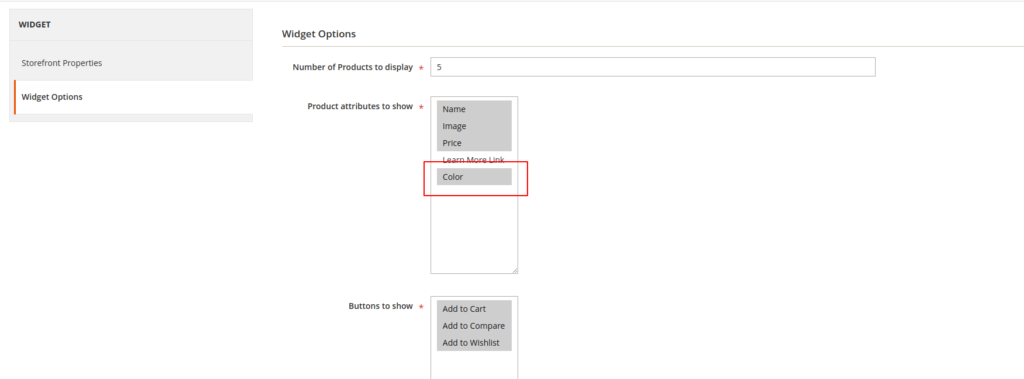](https://dolphinwebsolution.com/wp-content/uploads/2023/02/Widgets-Feature-Product-Elements-Content-Magento-Admin-1024x379-1.png)we all will get to know what is Widget in Magento 2.
Widgets provide powerful functionalities that are used to add dynamic or static content to store pages or blocks. You can add widgets in any CMS block of Magento 2 to display such content or elements, for example:
- Dynamic product data
- Dynamic lists of the recently viewed products
- Promotional banners
- Interactive navigation elements and action blocks
- Dynamic flash elements that are inserted in content pages
In the **recently viewed products widget** settings there are only **name**, **price**, **image**, and **learn\_more** available.
For the product attribute **name** i’ve spotted the file
***vendor/magento/module-catalog/view/frontend/ui\_component/widget\_recently\_viewed.xml*:**
```
Magento_Catalog/product/name
```
***vendor/magento/module-catalog/view/base/web/template/product/name.html*:**
```
```
### Steps To Add Custom Attribute Data To Recently Viewed Products Widget
We are already learned [how to create a basic module in Magento 2](https://dolphinwebsolution.com/how-to-create-module-in-magento-2). We need to create **module.xml** and **registration.php** files. You can create **module.xml** and **registration.php** from this tutorial.
Here we are using **Dolphin** as Vendor name and **Recently** as the name of the module. You can change this according to your Vendor and Module name.
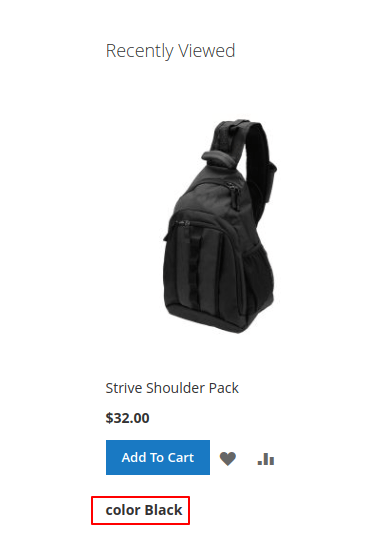
we have a custom product attribute color and we are going to include this attribute to be loaded in the recently viewed widget list view.
#### Step 1: Create widget file
Create a widget file **widget.xml** in app/code/Dolphin/Recently/etc folder with the following code.
```
```
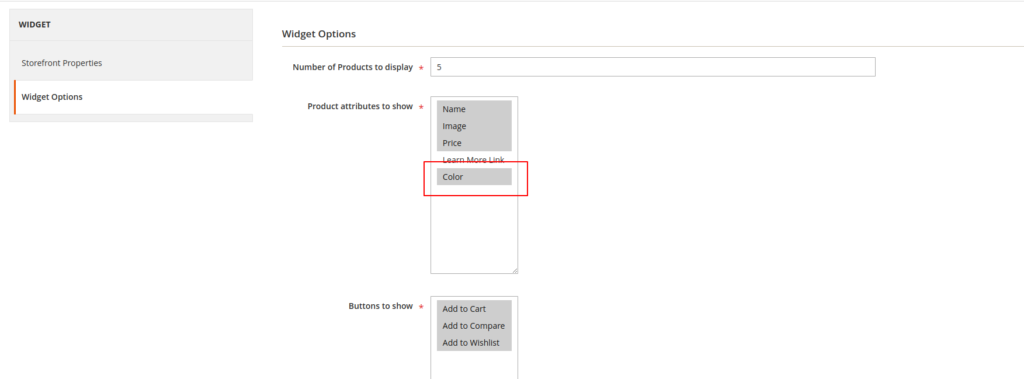
Once apply the above code you will be able to choose the option in **Widgets->Choose Widget->Widget Options->Product attributes** to show
#### Step 2: Create Dependency injection
Create dependency injection file **di.xml** in the **app/code/Dolphin/Recently/etc** folder with the following code.
```
\Dolphin\Recently\Ui\DataProvider\Product\Listing\Collector\Color
```
#### Step 3: Create an Extention Attribute
Create Extention Attribute file **extension\_attributes.xml** in the **app/code/Dolphin/Recently/etc** folder with the following code.
```
```
#### Step 4: Create a class file for DataProvider
Create Class file **Color.php** in the **app/code/Dolphin/Recently/Ui/DataProvider/Product/Listing/Collector** folder with the following code.
```
productRenderExtensionFactory = $productRenderExtensionFactory;
$this->productFactory = $productFactory;
}
/**
* @param ProductInterface $product
* @param ProductRenderInterface $productRender
*/
public function collect(ProductInterface $product, ProductRenderInterface $productRender)
{
$extensionAttributes = $productRender->getExtensionAttributes();
if (!$extensionAttributes) {
$extensionAttributes = $this->productRenderExtensionFactory->create();
}
if($color = $product->getColor()) {
$colorValue= $this->getOptionLabelByValue('color',$color);
$extensionAttributes->setColor($colorValue);
}
$productRender->setExtensionAttributes($extensionAttributes);
}
public function getOptionLabelByValue($attributeCode,$optionId)
{
$product = $this->productFactory->create();
$isAttributeExist = $product->getResource()->getAttribute($attributeCode);
$optionText = '';
if ($isAttributeExist && $isAttributeExist->usesSource()) {
$optionText = $isAttributeExist->getSource()->getOptionText($optionId);
}
return $optionText;
}
}
```
#### Step 5: Create widget definition
Create widget definition **widget\_recently\_viewed.xml** in the **app/code/Dolphin/Recently/view/frontend/ui\_component** folder with the following code.include our attribute as a column in the widget definition.
```
Dolphin_Recently/product/color
```
#### Step 6: Create a js file
Create js file **color.js** in the **app/code/Dolphin/Recently/view/frontend/web/js/product** folder with the following code.
```
define([
'Magento_Ui/js/grid/columns/column',
'Magento_Catalog/js/product/list/column-status-validator'
], function (Column, columnStatusValidator) {
'use strict';
return Column.extend({
/**
* @param row
* @returns {boolean}
*/
hasValue: function (row) {
return "color" in row['extension_attributes'];
},
/**
* @param row
* @returns {*}
*/
getValue: function (row) {
console.log(row['extension_attributes']['color']);
return row['extension_attributes']['color'];
},
/**
* @param row
* @returns {*|boolean}
*/
isAllowed: function (row) {
console.log(columnStatusValidator.isValid(this.source(), 'color', 'show_attributes') && this.hasValue(row) );
return (columnStatusValidator.isValid(this.source(), 'color', 'show_attributes') && this.hasValue(row) );
}
});
});
```
#### Step 7: Create Html template file
Create html template file **color.html** in the **app/code/Dolphin/Recently/view/frontend/web/template/product** folder with the following code.
```
```
Now execute the below command and go to the system configuration page:
\[dt\_highlight color=”” text\_color=”” bg\_color=””\]php bin/magento setup:upgrade\[/dt\_highlight\]
\[dt\_highlight color=”” text\_color=”” bg\_color=””\]php bin/magento setup:static-content:deploy -f\[/dt\_highlight\]
\[dt\_highlight color=”” text\_color=”” bg\_color=””\]php bin/magento cache:flush\[/dt\_highlight\]
**Result:**
I Hope, This instruction will be helpful for you.
**Happy Coding with magento2!! ?**
If you have any difficulties regarding this blog, do consider them posting in the Comments section below!
I’m here to help.
Thank you!
---
_View the original post at: [https://dolphinwebsolution.com/how-to-add-custom-attribute-data-to-recently-viewed-products-widget](https://dolphinwebsolution.com/how-to-add-custom-attribute-data-to-recently-viewed-products-widget)_
_Served as markdown by [Third Audience](https://github.com/third-audience) v3.5.3_
_Generated: 2026-08-26 06:54:26 UTC_