---
title: "How to Add Custom Tab to Admin Sales Order View in Magento 2"
url: "https://dolphinwebsolution.com/add-custom-tab-to-admin-sales-order-view-in-magento-2"
date: "2021-10-07T04:24:08+05:30"
modified: "2023-08-31T05:09:30+05:30"
author:
name: "Jigar Patel"
categories:
- "Magento"
word_count: 849
reading_time: "5 min read"
summary: "How to Add Custom Tab to Admin Sales Order View in Magento 2.
Magento 2, displays the Information, invoice, Credit Memos, Shipment and Comments History, etc. on the admin sales order view. Somet..."
description: "In this article, Today I will instruct on How to Add Custom Tab to Admin Sales Order View in Magento 2. Magento 2, displays the Information, invoice, Credit ..."
keywords: "Add Custom Tab to admin,Add Custom Tab to Admin magento 2,Add Custom Tab to Admin Sales Order View,Magento 2 Add Custom Tab to Admin,Add Custom Tab Sales Order View, Magento"
language: "en"
schema_type: "Article"
related_posts:
- title: "How to Create Sales Order Programmatically in Magento 2?"
url: "https://dolphinwebsolution.com/create-sales-order-programmatically-in-magento-2"
- title: "How to Fix Unique Constraint Violation Found in Magento 2"
url: "https://dolphinwebsolution.com/how-to-fix-unique-constraint-violation-found-in-magento-2"
- title: "Top 5 Best Magento Development Companies in USA (2026)"
url: "https://dolphinwebsolution.com/blog/best-magento-development-companies-in-usa/"
---
# How to Add Custom Tab to Admin Sales Order View in Magento 2
_Published: October 7, 2021_
_Author: Jigar Patel_

**How to Add Custom Tab to Admin Sales Order View** in Magento 2.
Magento 2, displays the Information, invoice, Credit Memos, Shipment and Comments History, etc. on the admin sales order view. Sometimes this tab may not be enough based on the requirements. Add your custom tab in Admin Order View page with just a simple module.
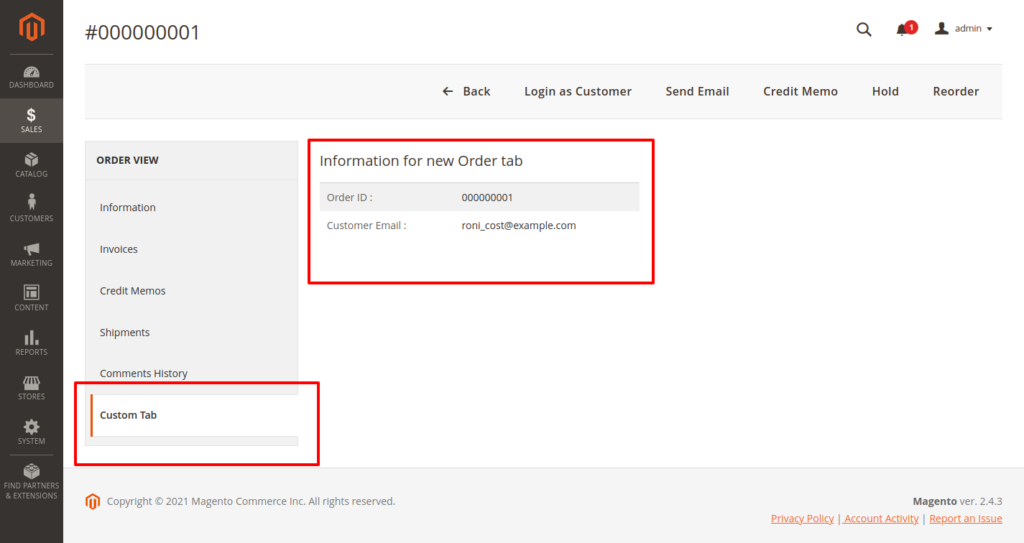
Introduce several ways to add an extra tab to order view, Taken **Dolphin** as Package name and **OrderSection** as Modulename for simplicity. code snippets are under a module named **Dolphin\_OrderSection**.
Before creating the customer tab, we need to create a new module We already have a blog on “[how to create a basic module in Magento 2](https://dolphinwebsolution.com/how-to-create-module-in-magento-2)“. We need to create **module.xml** and **registration.php** file. You can create **module.xml** and **registration.php** from this tutorial.
### Step 1: Create a Layout
Create a **“sales\_order\_view.xml”** file in the **app/code/Dolphin/OrderSection/view/adminhtml/layout** folder with the following code.
```
custom_tab
Dolphin\OrderSection\Block\Adminhtml\Order\View\Tab\CustomTab
```
The above file declares block for set custom tab logic. **addTab** is a method.
- The **``** instruction is deprecated. If the method implementation allows, use the **[``](https://devdocs.magento.com/guides/v2.4/frontend-dev-guide/layouts/xml-instructions.html#argument)** for **[``](https://devdocs.magento.com/guides/v2.4/frontend-dev-guide/layouts/xml-instructions.html#fedg_layout_xml-instruc_ex_block)** or **[``](https://devdocs.magento.com/guides/v2.4/frontend-dev-guide/layouts/xml-instructions.html#fedg_layout_xml-instruc_ex_ref)** to access the block public API. If there are two or more nodes with the same name under ``, they are passed as one array.
- **method:** The method name in the block and it’s a required field.
### **Step 2: C**reate a Block
Create a **CustomTab.php** file in the **app/code/Dolphin/OrderSection/Block/Admin/Order/View/Tab** folder with the following code.
```
_coreRegistry = $registry;
parent::__construct($context, $data);
}
/**
* Retrieve order model instance
*
* @return \Magento\Sales\Model\Order
*/
public function getOrder()
{
return $this->_coreRegistry->registry('current_order');
}
/**
* Retrieve order model instance
*
* @return int
*Get current id order
*/
public function getOrderId()
{
return $this->getOrder()->getEntityId();
}
/**
* Retrieve order increment id
*
* @return string
*/
public function getOrderIncrementId()
{
return $this->getOrder()->getIncrementId();
}
/**
* Retrieve order increment id
*
* @return string
*/
public function getCustomerEmail()
{
return $this->getOrder()->getCustomerEmail();
}
/**
* {@inheritdoc}
*/
public function getTabLabel()
{
return __('Custom Tab');
}
/**
* {@inheritdoc}
*/
public function getTabTitle()
{
return __('Custom Tab');
}
/**
* {@inheritdoc}
*/
public function canShowTab()
{
return true;
}
/**
* {@inheritdoc}
*/
public function isHidden()
{
return false;
}
}
```
Above block file implements from TabInterface and the more important function in this class is canShowTab and isHidden.
- **getTabLabel() :** This method return to tab label. **Returns – string**
- **getTabTitle() :** This method return to tab Title**. Returns – string**
- **canShowTab() :** Can show tab in tabs. **Returns – boolean**
- **isHidden() :** Tab is hidden. **Returns – string**
Also Read This: [How to Create Sales Order Programmatically in Magento 2?](https://dolphinwebsolution.com/create-sales-order-programmatically-in-magento-2)
### Step 3: Create a Template
The final step is to Create a template file that will be used to call block function. Create **customtab*.phtml*** file in the
**app/code/Dolphin/OrderSection/view/adminhtml/templates/order/view/tab** with the following code.
```
getChildHtml(); ?>
getOrderIncrementId(); ?>
getCustomerEmail(); ?>
```
**Now clear your cache. System >> Cache Management >> Flush Magento Cache**
After clearing your cache, your admin will show your custom tab on order view page.
I hope this instruction will be helpful for you.
If you have any difficulties regarding this blog, do consider them posting in the Comments section below!
I’m here to help. You can also [**hire Magento developer**](https://dolphinwebsolution.com/hire-magento-2-developers/) from our team. We are top notch Magento development company.
**Thank you!**
---
_View the original post at: [https://dolphinwebsolution.com/add-custom-tab-to-admin-sales-order-view-in-magento-2](https://dolphinwebsolution.com/add-custom-tab-to-admin-sales-order-view-in-magento-2)_
_Served as markdown by [Third Audience](https://github.com/third-audience) v3.5.3_
_Generated: 2026-08-26 06:55:02 UTC_