---
title: "Add Custom Select Options Attribute in Category Form Magento 2"
url: "https://dolphinwebsolution.com/add-custom-select-options-attribute-in-category-form-magento-2"
date: "2021-08-08T10:34:17+05:30"
modified: "2023-08-25T09:53:28+05:30"
author:
name: "Mahesh Makwana"
categories:
- "Magento"
word_count: 1087
reading_time: "6 min read"
summary: "We learn how to create custom category attributes using InstallData.php in Magento 2. When we develop modules or themes we need some custom attributes in category form for some requirements. We can..."
description: "We learn how to create custom category attributes using InstallData.php in Magento 2. When we develop modules or themes we need some custom attributes in cat..."
keywords: "custom select option,add custom select option,add custom select options, Magento"
language: "en"
schema_type: "Article"
related_posts:
- title: "How To Add Custom Button In System Configurations Magento 2"
url: "https://dolphinwebsolution.com/how-to-add-custom-button-in-system-configurations-magento-2"
- title: "Magento vs Shopify vs WooCommerce: Which E-commerce Platform is Right for You?"
url: "https://dolphinwebsolution.com/blog/magento-vs-shopify-vs-woocommerce/"
- title: "How to Enable Single Store mode"
url: "https://dolphinwebsolution.com/how-to-enable-single-store-mode"
---
# Add Custom Select Options Attribute in Category Form Magento 2
_Published: August 8, 2021_
_Author: Mahesh Makwana_

We learn how to create custom category attributes using[ **InstallData.php**](https://dolphinwebsolution.com/how-to-create-install-upgrade-uninstall-script-in-magento-2) in Magento 2. When we develop modules or themes we need some custom attributes in category form for some requirements. **We can add different type of category attribute like toggle, select, text, WYSIWYG editor, etc. type files in Category form.**
We used the InstallData.php file for creating custom category attributes. InstallData.php file places at your module path **app/code/VendoreName/ModuleName/Setup/InstallData.php**. This file executes only once when our module is installing the first time. After the module is successfully installed InstallData.php file does not execute. **It means the InstallData.php file only executes once while the module first time installed.**
If you don’t want to code Than you **MUST** try our Extension [Product custom option template.](https://dolphinwebsolution.com/shop/product-custom-option-templates-for-magento.html)
[](https://dolphinwebsolution.com/shop/product-custom-option-templates-for-magento.html)
Here, we creating one Custom Select Option input in Category Form
### Step-1: Create registration.php
Create **registration.php** at **app/code/Dolphin/CategoryAttribute**
```
```
### Step-3: Create InstallData.php
Create **InstallData.php** at **app/code/Dolphin/CategoryAttribute/Setup**
```
eavSetupFactory = $eavSetupFactory;
}
public function install(ModuleDataSetupInterface $setup, ModuleContextInterface $context)
{
$setup->startSetup();
$eavSetup = $this->eavSetupFactory->create(['setup' => $setup]);
/* Remove Category Attribute */
$eavSetup->removeAttribute(\Magento\Catalog\Model\Category::ENTITY, 'custom_select_options');
/* Add Category Attribute */
$eavSetup->addAttribute(
\Magento\Catalog\Model\Category::ENTITY,
'custom_select_options',
[
'type' => 'varchar',
'label' => 'Custom Select Options',
'input' => 'multiselect',
'visible' => true,
'required' => false,
'global' => \Magento\Eav\Model\Entity\Attribute\ScopedAttributeInterface::SCOPE_STORE,
'backend' => 'Magento\Eav\Model\Entity\Attribute\Backend\ArrayBackend',
'group' => 'General Information',
]
);
$setup->endSetup();
}
}
```
### Step-4: Create CustomOptionList.php
Create **CustomOptionList.php** at **app/code/Dolphin/CategoryAttribute/Model/Config/Source**
```
getOptions();
array_unshift($res, ['value' => '', 'label' => '']);
return $res;
}
public function getOptions()
{
$res = [];
foreach ($this->getOptionArray() as $index => $value) {
$res[] = ['value' => $index, 'label' => $value];
}
return $res;
}
public function toOptionArray()
{
return $this->getOptions();
}
}
```
### Step-5: Create category\_form.xml
Create **category\_form.xml** at **app/code/Dolphin/CategoryAttribute/view/adminhtml/ui\_component**
```
```
**After creating and updating the above files run Magento commands:**
```
php bin/magento setup:upgrade
php bin/magento setup:static-content:deploy -f
php bin/magento cache:clean
```
**Now you show the below output:**

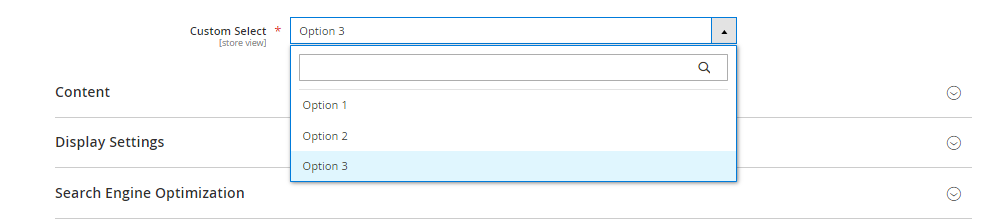
**Sometimes we have so many options in our select input then scrolling is difficult for the user. So now we add search select input by using the below code.**
Update **category\_form.xml** at **app/code/Dolphin/CategoryAttribute/view/adminhtml/ui\_component**
```
- Dolphin\CategoryAttribute\Model\Config\Source\CustomOptionList
-
- text
- true
- true
- Custom Select
- true
- Magento_Catalog/js/components/new-category
- multiselect
- 1
- false
- ui/grid/filters/elements/ui-select
- 30
-
- true
-
- custom_toggle
```
**After updating the above files run php bin/magento cache:clean Magento command.**
**Now you show the below output:**
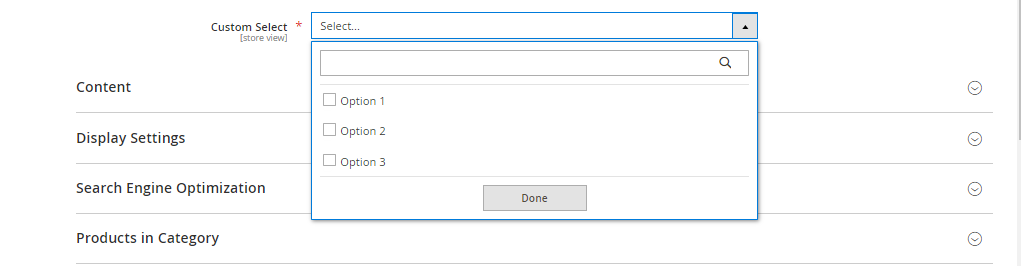
**If you want to use multi select input just comment - false
or replace false to true in above code. After updating the files run php bin/magento cache:clean [Magento command](https://devdocs.magento.com/guides/v2.4/config-guide/cli/config-cli-subcommands.html).**
**You also like to read this:**
- [Display image in admin UI Grid](https://dolphinwebsolution.com/magento-2-display-image-in-admin-ui-component-grid)
- [Create custom category atributes](https://dolphinwebsolution.com/how-to-create-custom-category-attribute-in-magento-2)
I hope this helps you. For any doubts regarding this topic, please write your doubts in the comments section.
---
_View the original post at: [https://dolphinwebsolution.com/add-custom-select-options-attribute-in-category-form-magento-2](https://dolphinwebsolution.com/add-custom-select-options-attribute-in-category-form-magento-2)_
_Served as markdown by [Third Audience](https://github.com/third-audience) v3.5.3_
_Generated: 2026-08-26 06:54:10 UTC_